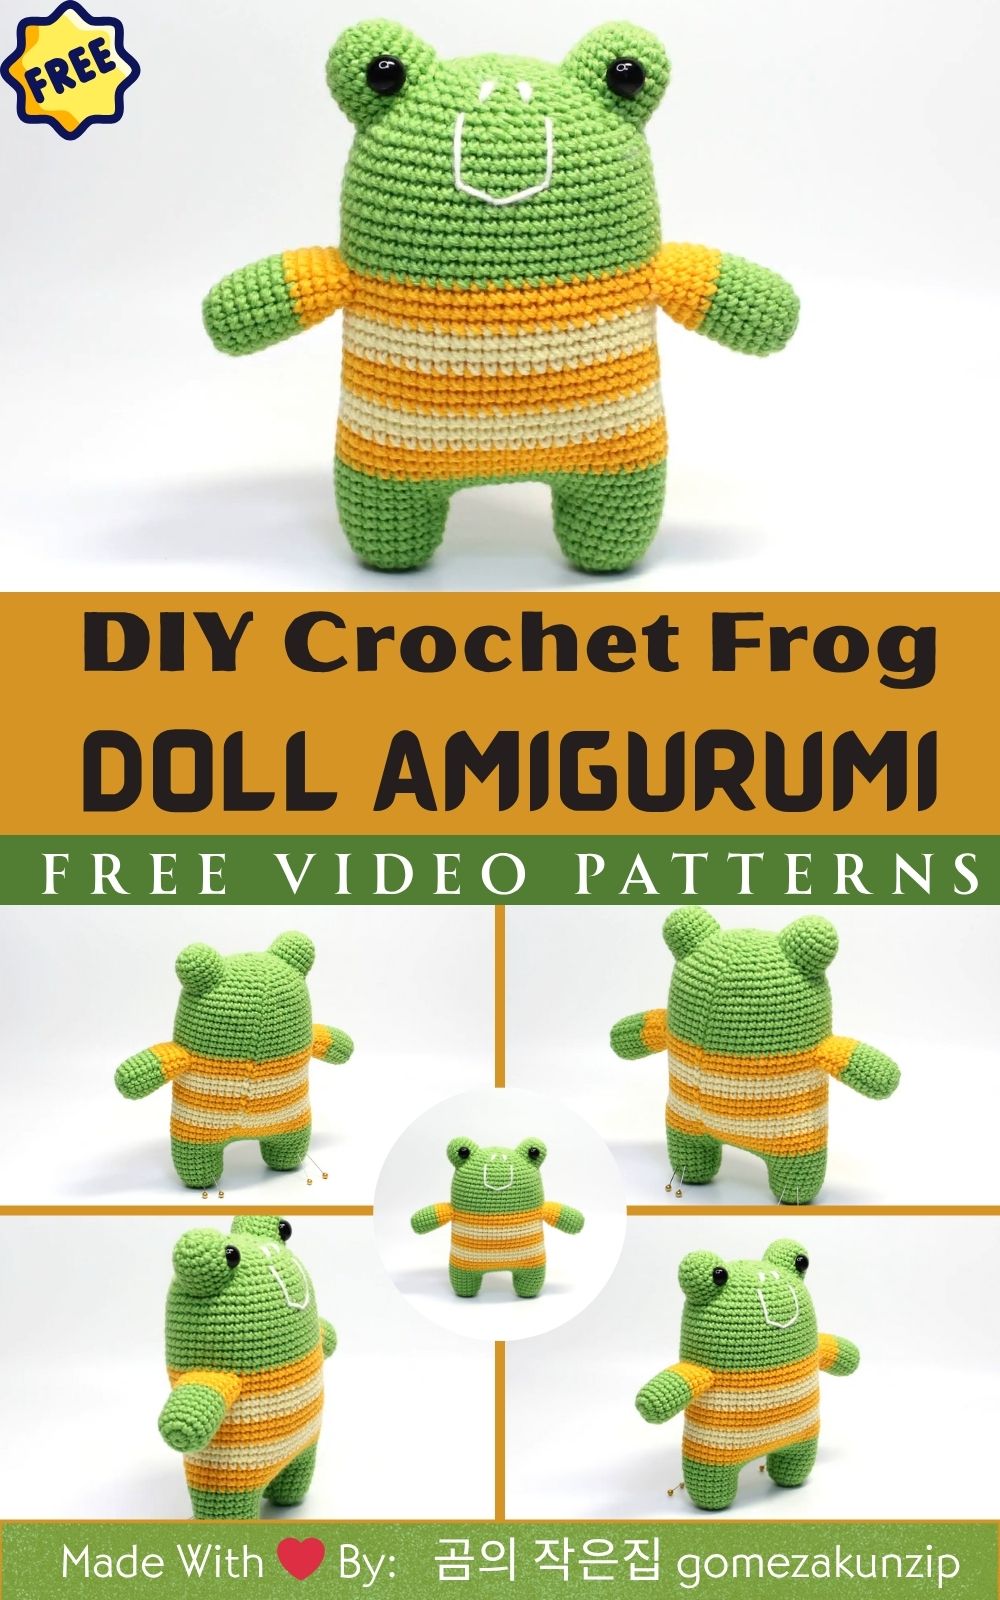
DIY Crochet Frog Amigurumi – Cute Frog Doll Toy Pattern & Tips
If there’s one amigurumi that instantly makes everyone smile, it’s the crochet frog! With its chubby cheeks, wide grin, and playful little legs, this tiny green friend is bursting with charm. Whether you’re new to crochet or a seasoned yarn artist, this DIY crochet frog amigurumi is the perfect weekend project simple, fun, and irresistibly cute.
When I first crocheted this little frog, I couldn’t stop giggling at how expressive he looked! His round body, little arms, and those big shiny eyes made him feel almost alive like he was about to hop right off my table. This project reminded me of lazy summer afternoons near the pond, surrounded by laughter and sunshine.
This frog isn’t just adorable; it’s therapeutic. Crocheting small, easy projects like this one is a great way to relax, de-stress, and reconnect with your creativity. Whether you make it for yourself or gift it to someone special, your handmade frog will carry the warmth of your time and care.
So, grab your yarn and hook let’s make this cute crochet frog doll together!
Why You’ll Love This Pattern
Here’s why this frog is everyone’s favorite amigurumi friend:
Super beginner-friendly even if it’s your first amigurumi!
Quick to finish make it in just a few hours.
Uses very little yarn, perfect for leftover skeins.
Adorable handmade gift for kids or nature lovers.
Great for craft fairs or Etsy listings they sell fast!
Easy to customize with accessories (tiny hats, bows, flowers).
Perfect for spring or summer crochet projects.
Brings joy to your shelf, desk, or workspace.
Can be turned into a keychain, plush, or charm.
Guaranteed to make everyone smile!
Materials & Tools
To make your DIY crochet frog amigurumi, you’ll need just a few simple materials:
Yarn: Soft cotton or acrylic DK weight yarn in green (main color), white (for eyes), and pink (for cheeks).
Crochet hook: 2.5-3 mm hook for neat, tight stitches.
Stuffing: Poly-fiberfill or soft toy stuffing for squishiness.
Eyes: 6 mm safety eyes or black embroidery thread if you prefer stitched eyes.
Extras: Stitch marker, yarn needle, and sharp scissors.
Pro Tip: Cotton yarn gives your frog a neat finish and helps it keep its perfectly round shape!
Crochet Pattern – Step by Step
Let’s get stitching! Here’s a simplified breakdown of how to make your cute crochet frog amigurumi.
1. Body
Start with a magic ring and make 6 single crochets (sc) into it.
Gradually increase each round to form a smooth, round sphere.
Continue crocheting until your frog’s body reaches your desired size — usually about 2-3 inches in height.
Stuff lightly with poly-fiberfill as you go.
When I made mine, I used a 3 mm hook, and it came out perfectly plump — not too big, not too tiny!
2. Head
The head should be slightly larger than the body for that cartoonish, cute look.
Repeat the same technique: start with a magic ring, increase every few rounds, and then decrease to close it up.
Before closing, insert your safety eyes about 6–8 stitches apart.
Tip: You can slightly tilt the eyes for a cheeky or sleepy expression — every frog will look unique!
3. Eyes
If you’re crocheting eyes instead of using safety ones:
Use white yarn and make a small circle (magic ring + 6 sc).
Add one more round of increases.
Stitch black pupils in the center.
Attach them carefully to the top of the head.
I love how expressive these crocheted eyes make the frog look — from sleepy to curious, each one has a different personality!
4. Arms & Legs
Make four small limbs using green yarn:
Chain 5 and crochet back with single crochets.
Slightly curve them as you go for a natural look.
Stuff them lightly if you wish.
Attach two limbs to the sides (arms) and two to the bottom (legs).
Pro Tip: Don’t overstuff you want them to stay soft and floppy!
5. Assembly
Now comes the fun part bringing your frog to life!
Sew the head onto the body securely.
Attach arms and legs symmetrically.
Add a soft smile using pink or black embroidery thread.
Optional: stitch two pink blush spots under the eyes for cuteness overload.
Pro Tips:
Use stitch markers to track your rounds.
Sew carefully so your stitches look neat and invisible.
Don’t stress about perfection every frog has its own personality!
When I finished mine, I couldn’t help smiling. The tiny blush cheeks gave it such an innocent, happy look.
Fun Ways to Use Your Crochet Frog
Once your frog is ready, there are endless ways to enjoy it!
Shelf or desk buddy: Perfect companion for your workspace.
Handmade gift: Kids and friends will adore it!
Stress-relief plush: Squeeze it during study or work breaks.
Craft fair item: Small frogs are great sellers!
Car charm or keychain: Add a chain and let it hang in your car.
Social-media photo prop: Perfect for cozy flat lays and Instagram shots.
Each frog I make finds a new “home” one sits on my bookshelf, another travels with my keys, and one even guards my yarn basket!
Customization Ideas
Let your imagination hop free!
Use different green tones — mint, lime, or forest.
Add tiny accessories — a hat, bowtie, or flower crown.
Make a frog couple for Valentine’s Day.
Turn one into a frog prince with a gold crown.
Create mini frogs as magnets, earrings, or phone charms.
When I crocheted a pastel mint frog with a pink bow, it instantly became my favorite! Customizing them is half the fun — every color gives a new personality.
Finishing & Assembly Tips
Before you show off your adorable frog, take a few extra minutes to give it a professional touch.
Sew parts symmetrically use pins to align them before attaching.
Stuff lightly for a soft, round look.
Secure yarn ends by weaving them in neatly.
For baby gifts, embroider eyes instead of using safety eyes.
Attach a keychain ring or bag clip if you want a travel buddy.
Gift idea: Wrap it in a clear bag with a ribbon and tag — pure handmade charm!
Extra tip: A tiny dab of blush or pastel eyeshadow can make your frog look even cuter in photos!
Crochet Care & Maintenance
Your little frog deserves love and care! Here’s how to keep it looking fresh:
Hand wash gently in cool water with mild soap.
Air dry flat in the shade (avoid direct sunlight).
Do not machine wash or tumble dry.
Reshape gently after washing to restore its roundness.
Store in a cool, dry place.
Optional: spray a soft fabric perfume for a clean, cozy scent.
I always hand-wash my amigurumi toys and let them dry on a towel overnight they come out good as new every time!
Final Thoughts
Every crochet project tells a story and this DIY crochet frog is pure happiness stitched into yarn.
When you hold the finished frog in your hand, you’ll realize it’s more than just a toy. It’s a symbol of patience, creativity, and love. Every stitch, every smile it’s your handmade joy taking shape.
So the next time you need a pick-me-up or a quick project to brighten your week, grab your yarn and make one of these happy little frogs. They’re small, cute, and bursting with personality!
Share your creations online with the hashtag #MyCrochetFrog — I’d love to see your adorable versions!
Until next time happy crocheting and stay inspired!
FAQ
1. What yarn works best for a crochet frog amigurumi?
Soft cotton or DK acrylic yarn works best. Cotton keeps its round shape beautifully, while acrylic adds extra softness.
2. How long does it take to make one?
You can finish your frog in 2-4 hours, depending on your crochet speed perfect for a cozy evening project!
3. Can beginners follow this pattern easily?
Absolutely! The steps are simple, repetitive, and ideal for beginners learning amigurumi basics.
4. How can I turn it into a keychain or charm?
Simply attach a keychain ring or lobster clasp to the top of the head. You can even make mini versions for keychains!
5. What’s the best stuffing for soft results?
Use poly-fiberfill stuffing for a fluffy, squeezable texture. Avoid overstuffing to keep it cuddly and lightweight.