Crochet Bear Beanie Hat Pattern With Sleepy Teddy Face for Beginner-Friendly
Shining yarn, a snug little beanie shape, and the sweetest bear ears bring instant cozy vibes. This Crochet Bear Beanie Hat is the kind of handmade project that looks extra adorable in baby photos and feels warm enough for everyday winter wear.
A playful crochet animal hat like this makes a thoughtful gift for babies and toddlers, and it also works as a quick weekend project. The sleepy, stitched face and raised-muzzle details add that “aww” factor without making the project feel complicated.
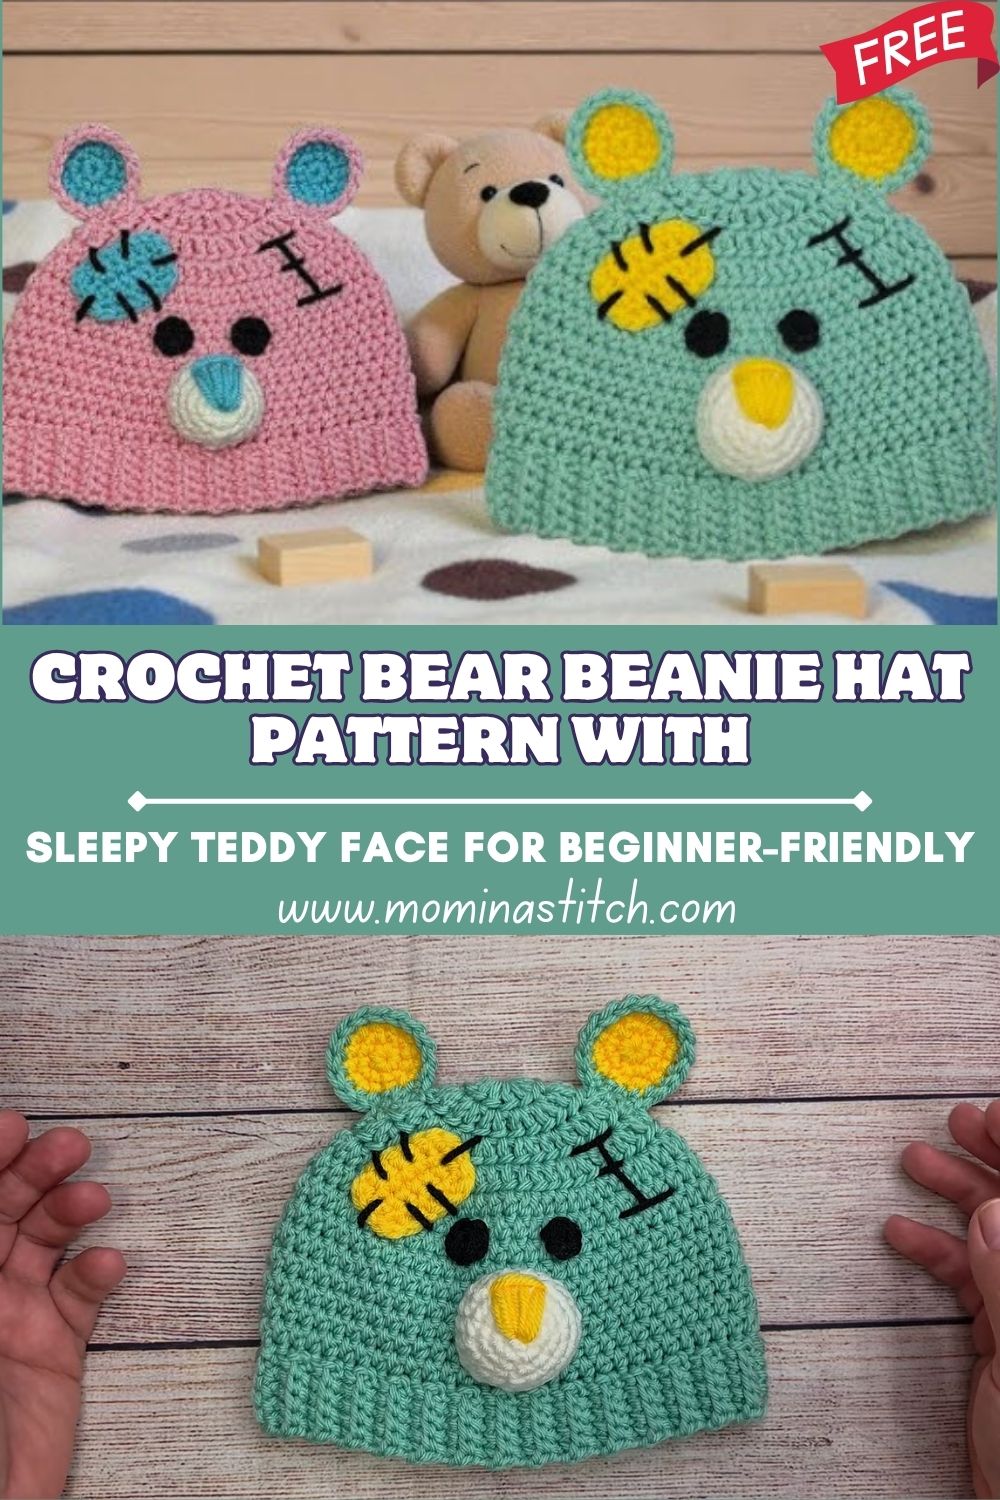
The charm of a Crochet Bear Beanie Hat comes from its simple shape paired with expressive details. The hat base stays nice and classic round, soft, and stretchy—while the personality comes from the rounded ears, a little muzzle that sits slightly raised, and a cartoon-like sleepy face. That combination feels both modern and timeless, like a tiny teddy bear turned into wearable coziness.
This design is especially perfect for anyone looking for a crochet baby beanie that stands out yet still feels beginner-friendly. Animal-inspired hats remain popular because kids love them, parents love the photo moments, and makers love how customizable they are. With a few color swaps and small embroidery changes, this teddy bear hat crochet pattern can become a whole collection of cute crochet hats for kids—and it still fits into the “relaxing evening crochet” category for a confident beginner.
Materials Needed
- Yarn type/weight: Worsted weight (#4) acrylic or cotton-acrylic blend (soft + easy wash)
- Main color yarn (bear hat): ~60–120 g (about 120–220 m), depending on size
- Contrast yarn (muzzle + inner ears): ~15–25 g (30–50 m) in cream/ivory
- Nose color yarn: ~5–10 g in brown, taupe, or pink
- Eye patch color (optional contrast): ~5–15 g (great for scraps)
- Embroidery color: Small amount of black yarn or black embroidery floss
- Hook size: 4.5 mm or 5.0 mm (use a smaller hook for tighter stitches)
- Tapestry needle (for sewing and embroidering)
- Stitch markers (at least 1, 2 is even better)
- Scissors
- Measuring tape
- Optional:
- Fleece lining (for extra warmth and softness)
- Elastic thread (sewn into brim for a snug fit)
- A pinch of polyfill (to lightly puff the muzzle)
Abbreviations
- MR = Magic ring
- ch = chain
- sl st = slip stitch
- sc = single crochet
- inc = increase (2 sc in same st)
- dec = decrease (sc2tog)
- hdc = half double crochet
- dc = double crochet
- BLO = back loop only
- FLO = front loop only
- st = stitch
- rep = repeat
Skill Level
Beginner to easy-intermediate.
Comfort with working in the round, counting stitches, and simple sewing/embroidery is helpful.
The hat is mostly single crochet with straightforward shaping.
Finished Size
Approximate sizes (stretchy beanie fit):
- Baby (0–6 months): 14–16” (36–41 cm) head circumference, ~5–6” tall
- Toddler (6 months–3 years): 16–18” (41–46 cm), ~6–7” tall
- Child (4–10 years): 18–20” (46–51 cm), ~7–8” tall
Size adjusts easily by changing hook size, yarn weight, or by adding/removing rounds to increase height.
Important Notes Before Starting
- Check fit as you go: Try the hat on (or measure against a similar beanie) once the circle is wide enough.
- Count stitches every round: Even one missed increase can make the crown look wavy or lumpy.
- Mind your gauge/tension: Tight stitches make a smaller hat; looser stitches make a larger hat.
- Plan face placement early: Mark the hat’s “front center” before sewing on the muzzle and patch.
- Neat sewing makes the magic: Use small, even whip stitches and shape pieces with your fingers before stitching them down.
Time Planning at a Glance
Estimated total time: 2–4 hours (depending on size and embroidery detail)
- Hat base: 60–120 minutes
- Ears (2): 20–35 minutes
- Muzzle + nose: 20–35 minutes
- Eye patch + face stitching: 15–35 minutes
- Assembly + finishing: 20–40 minutes
Step-by-Step Crochet Pattern
Hat Base (Crown Down, Worked in Rounds)
Notes:
- Use a stitch marker to mark the first stitch of each round. The hat is worked in continuous rounds (no joining) for a smooth look.
- Stitch counts below assume a classic flat circle increase (adding 6 sts per round).
Crown Increases
- Round 1: MR, 6 sc into MR. (6)
- Round 2: inc in each st around. (12)
- Round 3: (sc 1, inc) rep around. (18)
- Round 4: (sc 2, inc) rep around. (24)
- Round 5: (sc 3, inc) rep around. (30)
- Round 6: (sc 4, inc) rep around. (36)
- Round 7: (sc 5, inc) rep around. (42)
- Round 8: (sc 6, inc) rep around. (48)
- Round 9: (sc 7, inc) rep around. (54)
- Round 10: (sc 8, inc) rep around. (60)
How to Pick Your Size
- Baby: Stop increasing at 48–54 sts (Rounds 8–9)
- Toddler: Stop increasing at 54–60 sts (Rounds 9–10)
- Child: Continue one more:
- Round 11: (sc 9, inc) rep around. (66)
Tip: The crown should look flat like a small plate. If it starts to ripple, loosen tension or use a smaller hook.
Build Hat Height (Even Rounds)
After the last increase round, sc evenly around until the desired height:
- Baby: work even rounds until the hat measures ~5–6” from the crown
- Toddler: work even rounds until ~6–7””
- Child: work even rounds until ~7–8””
Comfortable Brim Options
Choose one finish:
Option A: Simple Finished Edge (easy + clean)
- Work 1 round of hdc evenly around (gives a soft, flexible edge).
- Work 1 round of sc evenly around.
- Sl st to next st, fasten off.
Option B: Subtle Ribbed Brim (a little extra snug)
- Work 1 round in BLO sc evenly around.
- Work 1 more round of regular sc evenly around.
- Sl st to next st, fasten off.
Ears (Make 2)
Outer Ear (main color)
- Round 1: MR, 6 sc. (6)
- Round 2: inc around. (12)
- Round 3: (sc 1, inc) rep around. (18)
- Round 4: (sc 2, inc) rep around. (24)
- Round 5: sc around. (24)
Fasten off, leave a long tail for sewing.
Inner Ear (contrast color, optional but adorable)
- Round 1: MR, 6 sc. (6)
- Round 2: (sc 1, inc) rep around. (9)
- Round 3: sc around. (9)
Fasten off, leave a tail.
Shape the Ear
- Lighten the outer Ear into a semicircle
- Center the inner Ear on top and stitch it down with small stitches.
- Don’t stuff the ears—keep them soft and squishy.
Muzzle Piece (Raised Snout Look)
Use a contrasting color (cream/ivory).
- Round 1: MR, 6 sc. (6)
- Round 2: inc around. (12)
- Round 3: (sc 1, inc) rep around. (18)
- Round 4: (sc 2, inc) rep around. (24)
- Round 5: sc around. (24)
Fasten off, leave a long sewing tail.
Optional dimension: Add a small pinch of stuffing just before fully sewing it onto the hat to keep it gently puffy.
Nose (Small Oval or Triangle Detail)
Choose a simple oval for a soft “teddy” look.
Oval Nose (worked in an oval)
- Ch 4
- In 2nd ch from hook: sc, in next ch: sc, in last ch: 3 sc
- Working down the other side of the chain: sc in next ch, sc in last ch. (8 total)
- Round 2: inc, sc, inc, sc, inc, sc, inc, sc (increase at the curved ends to keep oval shape). (12)
Sl st to next st, fasten off, leave tail.
Alternative: A tiny triangle nose (ch 2, 3 sc in first ch, then a small sc edge) also works—keep it small and centered.
Eye Patch / Decorative Face Patch (One Side)
Use a contrast color (slightly darker than the hat or a fun accent).
- Round 1: MR, 6 sc. (6)
- Round 2: (sc 1, inc) rep around. (9)
- Round 3: (sc 2, inc) rep around. (12)
- Round 4: sc around. (12)
Fasten off, leave a long tail.
Shape tip: Press it gently into a rounded “spot” shape. Slightly oval is fine—it looks cute and cartoony.
Facial Features (Sleepy Bear Style)
Use black yarn or embroidery floss on a tapestry needle.
Ideas for a sleepy/cartoon face:
- Closed eyes: stitch a gentle curved line (like a soft “U” turned sideways).
- Lashes: add 2–3 tiny short stitches at the outer end of one eye.
- Eyebrows: tiny curved stitches above the eyes for expression.
- Smile line: a small vertical stitch under the nose, then a tiny curved smile (optional).
Embroidery tip: Less is more. Step back and check the expression before tying off.
Assembly Instructions
- Choose the front of the hat: Place the seam-less side wherever it looks smoothest and mark the front center with a pin or stitch marker.
- Attach the muzzle:
- Position muzzle about 1.5–2.5” above the brim (depending on size).
- Stitch around the edge using small whipstitches.
- Add a pinch of stuffing just before closing the final section (optional).
- Attach the nose:
- Center it on the muzzle, slightly above the middle.
- Stitch neatly around the edges so it lies flat and clean.
- Place the eye patch:
- Position it to one side above the muzzle (like a teddy “spot”).
- Stitch down evenly, smoothing as you go.
- Embroider facial features:
- Stitch closed eyes aligned with the muzzle center.
- Add lashes on one side for that sleepy cartoon look.
- Add a small mouth line under the nose if desired.
- AtEarh ears:
- Fold each Ear slightly at the base to give it a rounded “cup” shape.
- Place ears evenly on the top sides of the hat (roughly symmetrical).
- Stitch securely—kids’ hats get tugged!
Finishing Touches
- Weave in all ends on the inside of the hat, traveling through several stitches for security.
- Gently shape the ears with your fingers so they sit upright and round.
- Check symmetry: ears level, muzzle centered, patch balanced.
- Lightly steam block (optional) to smooth the fabric—avoid flattening the muzzle.
Beginner Tips
- Use a stitch marker every round so the crown doesn’t drift.
- Count stitches out loud at the end of each increase round.
- Keep embroidery loose; tight embroidery can pucker the hat.
- Pin pieces before sewing so placement feels right.
- Choose soft, washable yarn for baby and toddler hats.
Common Mistakes to Avoid
- Hat too small: Add one more increase round or switch to a larger hook.
- Hat too tall/short: Add or remove a couple of even rounds before the brim.
- Uneven ears: Measure from the crown and place both ears at the same height.
- Face looks “off-center”: Mark the center front and align the muzzle/nose to it.
- Wavy crown: Too many increases or loose tension, double-check stitch counts.
Color Variations and Custom Ideas
- Pink bear beanie: Pastel pink hat with cream muzzle and a slightly darker pink nose, sweet for photo props.
- Mint bear beanie: Mint green hat with ivory muzzle and cocoa-brown nose for a fresh, modern look.
- Neutral beige teddy hat: Beige hat, cream muzzle, warm brown nose, classic teddy vibes.
- Sleepy bear face version: Closed eyes + tiny lashes + simple mouth line.
- Smiling bear version: Swap the sleepy eyes for two small stitched arcs and a wider little smile.
- Extras: Add a tiny bow near one Ear, a small crocheted flower, or a pom-pom on top for extra flair.
Conclusion
A Crochet Bear Beanie Hat like this brings together everything lovable about handmade kids’ accessories: warmth, personality, and that soft teddy-bear sweetness. The simple beanie base keeps it beginner-friendly, while the ears, patch, and raised muzzle make it feel extra special.