Crochet Shirt Bag With Collar Pocket Buttons and Long Strap For Learners
Inspired by classic shirt styling, this Crochet Shirt Bag turns simple stitches into a polished little handbag. Ideal for everyday errands or gifting, it works beautifully as a crochet crossbody bag or a cute mini shirt purse, and is finished with neat collar and button details for a trendy fashion look.
Designed for simple outings and sweet surprises, this crochet mini bag works beautifully as a crossbody or a shirt purse. The design looks trendy, feels personal, and fits right in with modern crochet fashion bag styles.
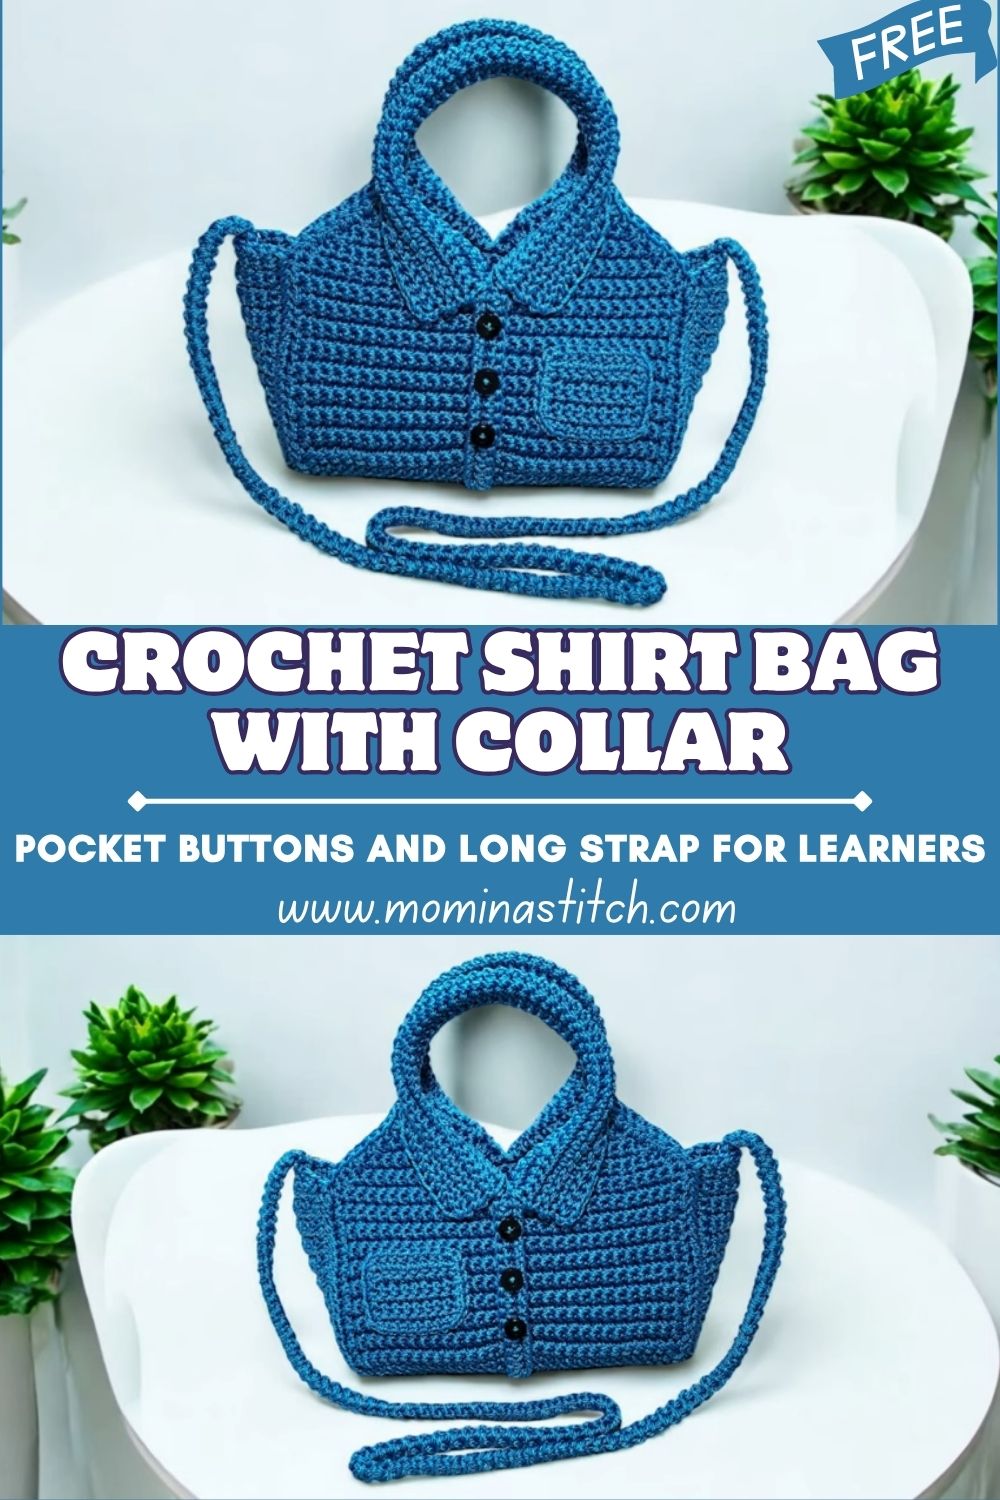
This Crochet Shirt Bag is designed to resemble a mini collared shirt, complete with a folded collar and a buttoned front. The shape is clean and structured, so the bag looks polished even in a simple, solid color like denim blue. The details are what make it adorable: the collar frames the top like a real shirt’s neckline, and the button band gives it that “dressy” shirt-purse style.
Function also matters, and this crochet crossbody bag keeps things easy. A front pocket adds a handy spot for lip balm or a transit card, and the long strap lets the bag sit comfortably on the shoulder or across the body. Best of all, this beginner crochet bag is made with basic rows, simple seaming, and beginner-friendly shaping, so it feels doable even without advanced skills.
Materials Needed (Exact Measurements)
- Yarn: Medium-weight cotton yarn (Category 4) recommended for structure
- Amount: 120 to 180 g (about 220 to 330 yards)
- Color: Denim blue, or any preferred color
- Hook: 3.5 mm to 4 mm crochet hook (use 3 mm for tighter stitches)
- Buttons: 3 to 5 small buttons, 10 to 12 mm in diameter
- Yarn needle: 1 tapestry needle for sewing and weaving ends
- Scissors
- Stitch marker: 1 to 2 markers
- Optional lining fabric: 1 piece about 10 x 8 in (25 x 20 cm), plus sewing thread
Abbreviations (US Terms)
- MR: Magic ring
- sc: single crochet
- hdc: half double crochet
- dc: double crochet
- sl st: slip stitch
- ch: chain
- st: stitch
Skill Level
Beginner to Easy-Intermediate.
The body uses simple rows of sc or hdc, with minimal shaping. The main “challenge” is neat seaming and keeping both panels the same size.
Approximate Size
- Bag body: about 7 in wide x 7 in tall (18 x 18 cm)
- Pocket: about 3 in wide x 3 in tall (7.5 x 7.5 cm)
- Strap length: about 40 to 48 in (102 to 122 cm), adjustable to preference
Time Required
- Total time: about 3 to 6 hours
- Body panels: 1.5 to 2.5 hours
- Pocket, collar, and button band: 1 to 2 hours
- Strap + finishing: 1 to 1.5 hours
Important Notes Before Starting (5 points)
- Maintain even tension so the panels stay flat and match in size.
- Count stitches carefully at the end of each row for straight edges.
- Keep edges straight by using a turning chain consistently and not skipping the last stitch.
- Check the symmetry of the collar pieces so both sides fold evenly.
- Secure the buttons properly with a strong thread and knot them well for daily use.
Step-by-Step Pattern
Part 1: Main Body Panels (Front and Back)
This crochet handbag pattern uses two flat rectangles. Choose sc for a firmer fabric or hdc for a slightly softer drape.
- Foundation chain: Ch 31 (adjust for width: any odd or even is fine, just keep both panels the same).
- Row 1: In 2nd ch from hook, sc across (30 sc). Ch 1, turn.
- Row 2 to Row 36: Sc across (30 sc). Ch 1, turn.
- For a taller bag, add more rows.
- For a wider bag, start with a longer chain.
- Make two identical panels:
- One will be the front (pocket and buttons go here).
- The other will be the back.
Optional texture idea: Use hdc instead of sc for all rows, or alternate rows of sc and hdc for a subtle ribbed feel.
Part 2: Joining the Body
Now the panels take on a mini bag shape.
- Place panels wrong sides together (or right sides together if preferred, then flip)
- Join yarn at one top corner.
- Seam sides and bottom:
- Sl st through both layers down the first side.
- Continue across the bottom.
- Sl st up the second side.
- Stop at the top, nd leave the pen.
For extra strength, seam using sc instead of sl st. This adds a slightly thicker edge, which can look really clean for a crochet fashion bag.
Part 3: Creating the Collar
The collar creates the “shirt” illusion. It sits at the top front edge and folds down.
- Find the top edge of the front panel. Mark the center with a stitch marker.
- Count about 8 to 10 stitches out from the center on each side. These stitches will become the “neck opening” space.
- Join yarn on the left side of the marked opening area.
- Collar base row: Sc along the top front edge until you reach the right side of the opening area. Ch 1, turn.
- Collar shaping rows (make two flaps):
- Work on the left section only: sc 6, knitwise, for 4 rows to form a small rectangular flap. Fasten off.
- Repeat on the right section with the same stitch count and row count.
- Fold each flap down and slightly inward to resemble a shirt collar. Stitch the inner corners down neatly so the collar stays in shape.
Tip: Keep both collar flaps identical. A collar that is even on both sides makes the whole crochet shirt purse look more polished.
Part 4: Front Pocket
A pocket adds a cute detail and real function.
- Pocket foundation: Ch 13.
- Row 1: Sc in 2nd ch from hook and across (12 sc). Ch 1, turn.
- Rows 2 to 12: Sc across (12 sc). Ch 1, turn.
- Fasten off, leave a long tail for sewing.
Place the pocket on the front panel, centered and about 2 in (5 cm) above the bottom edge. Sew the sides and bottom of the pocket down using whip stitch or mattress stitch.
Part 5: Button Band
This strip creates the look of a shirt front opening.
- Band foundation: Ch 6.
- Row 1: Sc in 2nd ch from hook and across (5 sc). Ch 1, turn.
- Rows 2 to Row 20 to 26: Sc across (5 sc). Ch 1, turn.
- Aim for a length that runs from near the bottom up toward the collar area on the front panel.
Sew the band vertically on the front panel, slightly off-center like a shirt placket. After that, sew 3 to 5 small buttons evenly spaced down the band.
Optional: Add a second matching strip on the other side for a more realistic buttoned-shirt look, even if it is only decorative.
Part 6: Strap
A strong strap makes this a comfortable crochet crossbody bag.
- Chain: Ch 160 to 190 (depending on desired length).
- Row 1: Sc in 2nd ch from hook and sc across. Ch 1, turn.
- Row 2 to Row 4: Sc across. Ch 1, turn.
- Fasten off and leave long tails for sewing.
This makes a flat strap that feels sturdy. For an even thicker strap, add 1 to 2 more rows.
Attach one end of the strap to one side seam near the top opening. Attach the other end to the opposite side seam. Stitch several times, then weave in securely.
Part 7: Side Edges and Finishing Border
A border upgrades the finish and helps the top edge feel neat.
- Join yarn at a side seam near the opening.
- Sc evenly around the top opening edge.
- At corners, place 2 sc in the same stitch to avoid puckering.
- Finish with a sl st to the first sc, then fasten off.
For a cleaner, tighter edge, use sl st around instead of sc. This gives a crisp outline that suits the shirt style.
Part 8: Assembly
Now all pieces come together neatly.
- Confirm the pocket placement is straight.
- Confirm the button band is aligned and secure.
- Confirm the collar flaps match in size and fold the same way.
- Weave in all ends on the inside, trimming yarn tails carefully.
- Optional lining: Stitch lining fabric inside using small hand stitches around the top edge.
Part 9: Finishing Touches
For the final look, small adjustments make a big difference.
- Adjust the collar shape so it sits flat and even.
- Re-check buttons and reinforce with extra stitches.
- Smooth the pocket corners and add a few extra stitches at the top corners of the pocket for added strength.
- Shape the bag with your hands, flatten the seams, and gently stretch the top opening so it sits nicely.
Beginner Tips
- Use stitch markers on row ends so edges stay straight and even.
- Measure both body panels often, especially after every 8 to 10 rows.
- Block panels lightly before seaming for a cleaner, more “store-bought” shape.
- Sew slowly using small, even stitches, so seams look tidy.
- Choose cotton yarn for structure, especially for an easy crochet purse meant for daily use.
- Keep button spacing consistent by pinning buttons in place first.
- For a stronger strap, use tighter tension or a smaller hook than the bag body.
Common Mistakes to Avoid
- Making uneven panels, which causes the bag to twist after joining.
- Skipping stitches at the ends of a row creates slanted sides.
- Sewing the strap with too few stitches, leading to a strap that pulls loose.
- Misaligned collar flaps that fold unevenly and look lopsided.
- Placing the pocket too low so it interferes with the bottom seam.
- Attaching buttons without reinforcing, especially for a bag that is used often.
- Not checking sizing early, then realizing the bag is wider or narrower than expected.
Color Combination Ideas
- Denim blue with white buttons: classic shirt vibe and super wearable.
- Pastel pink with pearl buttons: sweet and soft, great for spring outfits.
- Beige with wooden buttons: natural, modern, and minimal.
- Black with gold buttons: sleek and dressy, perfect as a crochet fashion bag.
- Custom stripes: two-tone collar or pocket edge for a playful “shirt” detail.
Uses of This Crochet Bag
This Crochet Shirt Bag serves as a lightweight daily bag for essentials like a phone, cards, keys, lip balm, and earbuds. It also feels special as a crochet mini bag for dinners, markets, or travel days when a big bag is too much. As a gift, it shines because it looks handmade in the best way, thoughtful, detailed, and unique. It can also be styled as a crochet shirt purse that upgrades simple outfits, especially with denim shades, neutrals, or pastel colors.
Conclusion
A shirt-inspired bag brings such a charming twist to everyday crochet, and this Crochet Shirt Bag is one of those designs that always gets compliments. The collar, pocket, and buttons add personality, while the long strap keeps it practical and comfortable. Try classic denim blue, switch up the buttons, or add a lining for extra polish, and enjoy making a handmade piece that feels both cute and wearable.