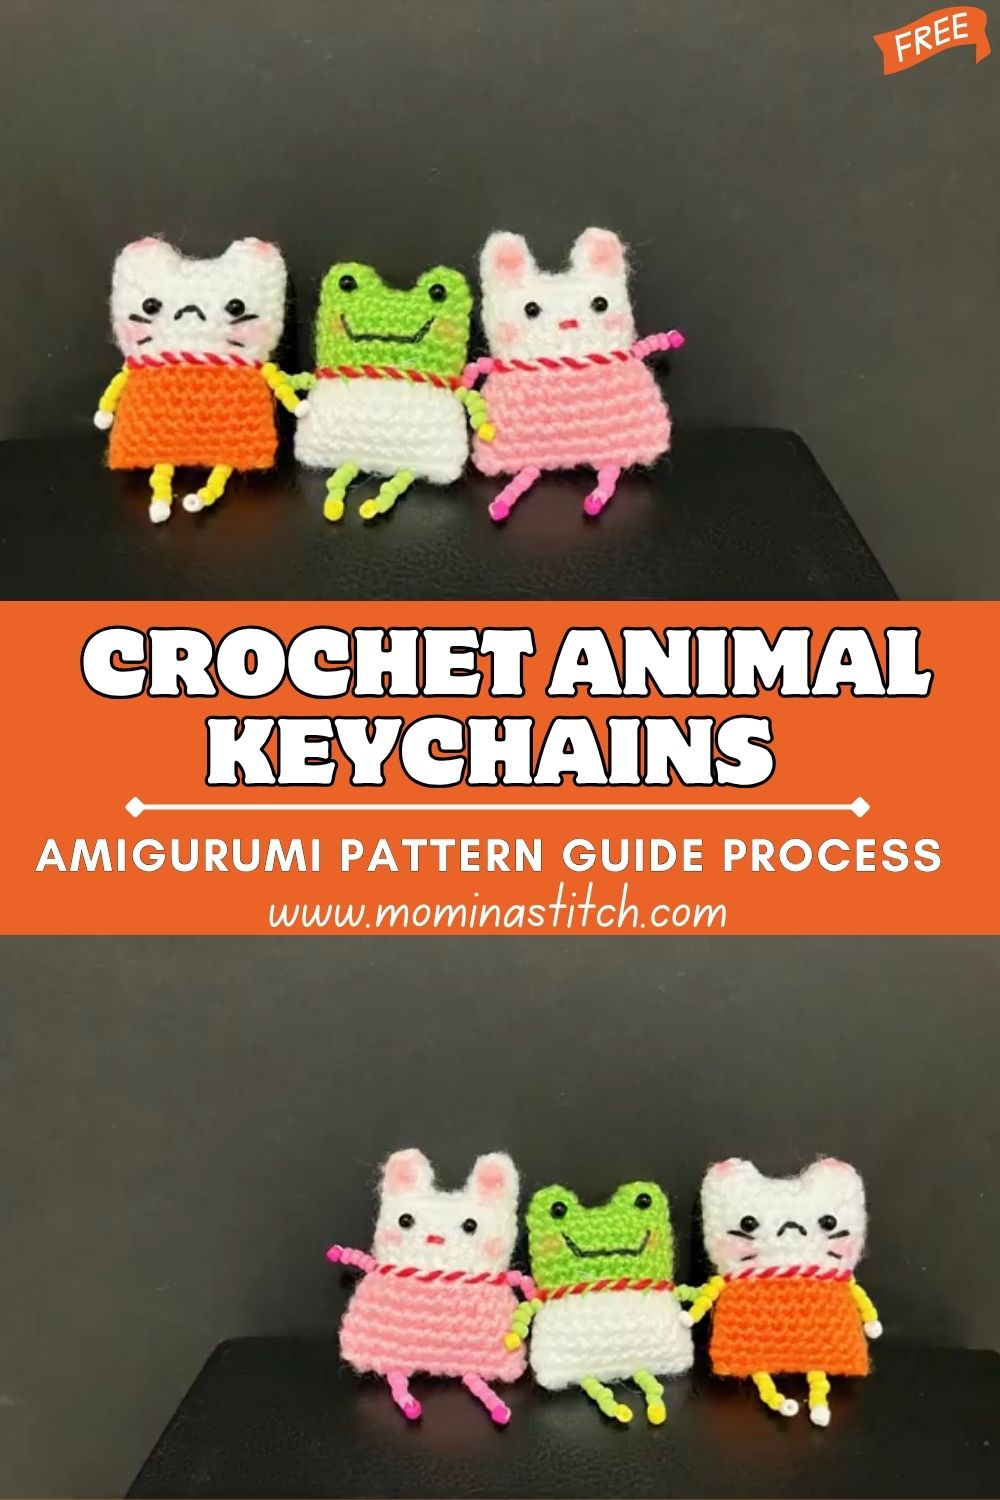
Wondrous Crochet Animal Keychains Amigurumi Pattern Guide Process and Visual Tips
If you love tiny, adorable crafts, Crochet Animal Keychains Amigurumi are the perfect project, quick to make, easy to carry, and impossible not to smile at. They’re ideal as bag charms, gifts, and cute everyday accessories.
From a playful crochet cat keychain to a cheerful crochet frog keychain and a sweet crochet bunny keychain, these mini amigurumi designs look professional yet beginner-friendly. With simple stitches and clean finishing, you can create a whole collection in your favourite colours.
These tiny animals are also a growing trend in handmade crafts because they feel personal. A store-bought keychain can be cute, but a handmade amigurumi charm feels special because someone took time to stitch each round, shape each ear, and add that tiny blush or smile. For creators, an amigurumi keychain pattern is a great entry point into selling crochet items: they use small amounts of yarn, take less time than plush toys, and can be customized endlessly (colours, expressions, accessories, themes).
Materials Needed
To make crochet animal keychains like the cat, frog, and bunny, you typically need:
- Yarn in orange, green, pink, white (plus black for embroidery if needed)
- Crochet hook (commonly 2.5mm–4.0mm depending on yarn)
- Tapestry needle for sewing parts
- Stitch marker
- Scissors
- Fiberfill stuffing
- Safety eyes (optional) or embroidery thread
- Keyring/lobster clasp + jump ring (hardware)
Skill Level
Skill Level: Beginner to Intermediate.
You should know single Crochet in the round and be comfortable counting stitches. Sewing small parts neatly is the main “level-up” skill here.
Important Notes Before Starting
- Use a small hook for tight stitches so stuffing won’t show through gaps—this matters most in mini amigurumi.
- Choose durable yarn (cotton or cotton blend) for clear stitch definition and a long-lasting shape on keychains.
- Count rounds carefully using a stitch marker; small projects get uneven quickly if you miss increases.
- Secure all parts firmly (ears, limbs, keychain loop). Keychains face daily pulling and friction.
- Test face placement first: pin or lightly tack eyes, blush, and mouth before final stitching to get the cutest expression.
Crochet Pattern Process
Basic Stitches Used (Amigurumi Foundations)
Most amigurumi keychain patterns rely on these core stitches:
- Magic Ring (MR): creates a tight centre start
- Single Crochet (sc): main stitch for dense fabric
- Increase (inc): 2 sc in one stitch to grow the circle
- Decrease (dec): invisible decrease to shape smoothly
- Slip stitch (sl st): for joining or finishing edges
- Chain (ch): sometimes for small straps or loops
Step 1: Head and Body Creation (Mini Amigurumi Shape)
Many keychains use either:
- A single combined head-body (faster, fewer seams), or
- A separate head and body sewn together (more shaping control)
Typical tutorial flow:
- Start with a magic ring and crochet a small circle.
- Increase in rounds to form a sphere/oval head.
- Crochet a few even rounds for height.
- Begin decreasing to close; add stuffing before fully closing.
- If there’s a separate body, repeat a smaller sphere/oval and sew to the head.
Design technique: keeping the head slightly larger than the body makes the character look “cute and chibi.”
Step 2: Ears and Limbs (Animal-Specific Details)
Cat Ears
- Usually made as two small triangles or rounded cones.
- Sew onto the top of the head with a slight outward angle.
Frog Details
- Frogs may have a simpler head with minimal ears; the character comes from the green colour and face.
- Some designs add tiny eye bumps or a white belly patch.
Bunny Ears
- Long oval shapes, lightly stuffed or left flat.
- Sew upright or slightly bent for extra personality.
Tiny Arms/Feet (Optional)
- Small tubes or flattened ovals sewn to the sides/bottom.
- On keychains, limbs are often kept minimal so the charm stays compact.
Step 3: Facial Detailing (The “Cute” Step)
This is where the personality appears:
- Place eyes between the “widest” part of the head (usually mid-round).
- Add blush (pink yarn circles/felt dots/embroidery).
- Stitch a small smile or mouth line using thin black yarn or embroidery floss.
- Add extra details: whiskers for a cat, a tiny muzzle, or a white face patch.
Pro tip: Embroidering faces is often safer and more durable for keychains than large plastic pieces.
Step 4: Final Assembly and Keychain Attachment
- Sew head to body (if separate).
- Attach ears/limbs securely with tight stitching.
- Create a top loop: crochet a small chain loop or stitch a yarn strap into the head.
- Attach jump ring + keyring clasp.
- Weave in all ends securely into the body to prevent unravelling.
Reinforcement tip: stitch through the loop area multiple times—this is the main stress point.
Customisation & Styling Ideas
Here are some simple ways to make these keychains even cuter and more unique:
- Add tiny accessories like a mini bow, scarf, cap, flower, or heart patch.
- Try different facial expressions (sleepy eyes, a wink, or a surprised mouth).
- Use stripes or spots for themed looks (tiger cat, polka-dot frog, pasPersonalize
- Personalise with a name tag or alphabet/initial charm.
- Create matching colour themes (pastel, neon, or earthy tones).
Amigurumi Design Techniques Used
- Chibi proportions: big head, small body for extra cuteness
- Colour blocking: strong base colour (orange/green) with white or pink accents
- Minimal facial embroidery: simple eyes + blush + smile creates instant character
- Tight tension: essential for clean, sturdy mini plush shapes
Beginner-Friendly Tips
- Start with cotton yarn for clearer stitches.
- Use invisible decreases to avoid bumpy shaping.
- Pin parts before sewing to keep symmetry.
- Don’t rush facial embroidery—do it in good light and check placement twice.
- Make one “test keychain” to lock in your hook size and stuffing amount.
Finishing Touches
- Add a small blush or highlight stitch for extra charm.
- Trim and hide all yarn ends neatly inside the body.
- Gently reshape the head and ears for a clean silhouette.
- Reinforce the keychain loop with extra stitches for long-term durability.
Common Mistakes to Avoid
- Loose tension: creates holes and visible stuffing.
- Incorrect counting: leads to uneven heads or lopsided shapes.
- Weak sewing: ears or loops can detach with daily use.
- Overstuffing: stretches stitches and ruins smooth shaping.
Care Instructions
- Spot clean gently with mild soap and a damp cloth.
- If needed, hand-wash in lukewarm cold water; avoid harsh rubbing.
- Air dry flat and reshape while damp.
- Keep hardware dry to prevent rust and maintain shine.
Conclusion FOR ( Crochet Animal Keychains Amigurumi )
These crochet animal keychains, cat, frog, and bunny, combine simple amigurumi methods with smart design choices: bright colours, tight stitching, and tiny facial details that create big personalities. Whether you’re making them as handmade crochet gifts or planning a small business, itele is beginner-friendly, customizable, and always in demand.