Crochet Easter Bunny Egg Holder Pattern Beginner-Friendly Basket Cozy
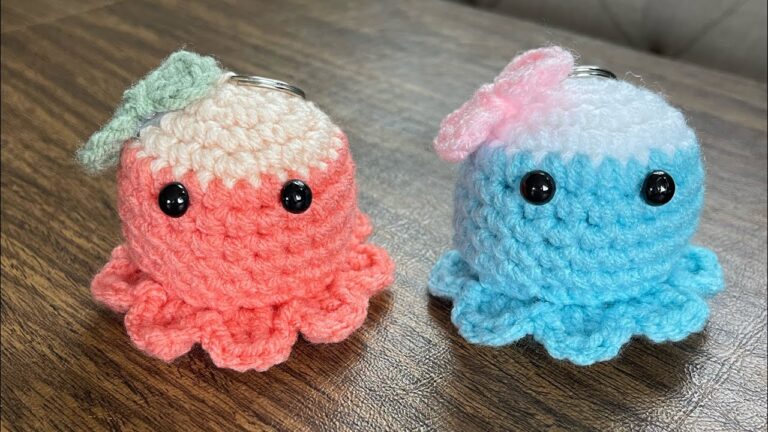
This crochet Easter bunny egg holder is a playful little amigurumi-style basket that hugs an egg right in the middle, perfect for Easter tables and gift baskets. With long bunny ears, a sweet face, and tiny feet, it’s a fun, creative spring craft that works up quickly and looks adorable in any pastel color.
A crochet Easter egg holder is a small basket or cozy designed to hold a standard chicken egg (real, plastic, or chocolate) for decorating, gifting, or Easter morning surprises. Bunny-themed designs are especially popular for Easter because they instantly match the season, look cute in photos, and are kid-friendly without being complicated to crochet. This crochet bunny egg holder can be used as a charming table decoration, a handmade addition to Easter baskets, a quick spring gift, or a fun kids’ craft item when filled with plastic eggs or tiny treats.

The design shown looks great in multiple colorways—like green, cream, and pink—making it easy to create a coordinated set or mix-and-match your leftover yarn. It’s beginner-friendly and typically takes about 1–2 hours per bunny.
3) Materials Needed
- Yarn type: Worsted/Aran (#4) cotton (sturdy) or acrylic (soft); cotton is ideal for a basket-style holder
- Yarn colors (examples):
- Green, cream, pink (as shown)
- Small amounts of black (eyes) and pink (nose) if embroidering
- Crochet hook: 3.0 mm–3.5 mm (use smaller hook for tighter fabric)
- Scissors
- Yarn needle
- Stitch markers
- Safety eyes (6–8 mm) or embroidery thread (black for eyes, pink for nose)
- Stuffing (optional): a pinch for the head/snout if you want extra dimension
- Optional: chocolate/plastic egg for fitting while you crochet
4) Crochet Abbreviations (US Terms)
- ch – chain
- sc – single crochet
- inc – increase (2 sc in same st)
- dec – decrease (sc2tog / invisible decrease)
- sl st – slip stitch
- st – stitch
- rnd – round
- BLO – back loop only (optional, for a crisp edge)
5) Finished Size (Egg Fit)
- Approx finished height (without ears): 4–5 in (10–13 cm) depending on yarn/hook
- With ears: 6–8 in (15–20 cm) depending on ear length
- Fits: 1 standard chicken egg (approx 2–2.5 in /, 5–6.5 cm tall) or a plastic/chocolate egg of similar size.
Tip: For the best fit, keep the basket stitches tight so the egg doesn’t slip out.
6) Step-by-Step Crochet Pattern
Pattern Notes
- Work in continuous rounds unless specified.
- Use a stitch marker to track the first stitch of each round.
- Adjusthe t hook size down if you see gaps.
A) Bunny Body / Egg Holder Basket
This part forms the base and sides, with an open top to hold the egg.
Base (work in a spiral)
Rnd 1: MR, 6 sc (6)
Rnd 2: inc around (12)
Rnd 3: (sc, inc) x6 (18)
Rnd 4: (2 sc, inc) x6 (24)
Rnd 5: (3 sc, inc) x6 (30)
Want a wider base for larger eggs? Add: Rnd 6: (4 sc, inc) x6 (36)
Create the “basket edge” and build height
Next rnd (edge): sc around in BLO (30 or 36)
This creates a crisp corner between base and sides.
Side rnds: sc around for 5–7 rnds (keep same stitch count)
Shape the basket opening (gentle snug)
To slightly hug the egg:
- If you’re at 30 sts:
Next rnd: (3 sc, dec) x6 (24)
Then 1–2 rnds sc around (24) - If you’re at 36 sts:
Next rnd: (4 sc, dec) x6 (30)
Then 1–2 rnds sc around (30)
Fasten off and weave in.
Fit check: Insert an egg. The egg should sit securely with the top visible.
B) Bunny Head
A simple round head that sits on the basket’s front/top edge.
Rnd 1: MR, 6 sc (6)
Rnd 2: inc around (12)
Rnd 3: (sc, inc) x6 (18)
Rnd 4: (2 sc, inc) x6 (24)
Rnd 5–6: sc around (24)
Rnd 7: (2 sc, dec) x6 (18)
Lightly stuff (optional).
Rnd 8: (sc, dec) x6 (12)
Rnd 9: dec x6 (6)
Fasten off, leaving a long tail for sewing.
Eye placement + face
- If using safety eyes: place them between Rnd 4 and Rnd 5, about 5–6 stitches apart.
- If embroidering: stitcha small “V” or dot eyes with black thread.
- Nose/mouth: embroider a tiny pink triangle or vertical nose, then add a small “Y” smile underneath.
C) Bunny Ears (Make 2)
Long, slightly floppy ears that sew onto the head.
Ch 16–22 (shorter for baby egg holders, longer for dramatic floppy ears)
Work back along the chain:
- Row 1: sc in 2nd ch from hook, sc in next 4, hdc in next 4, dc in next 4, hdc in next 2, sc in remaining chs. Ch 1, turn.
- Row 2: sc across (or use sl st/sc mix for a firmer ear). Ch 1, turn.
- Row 3 (optional for thicker ear): sc across.
Fasten off leaving a long sewing tail.
If you want a more “inner ear” look like the image style, make the ear in the same main color and add a thin embroidered line down the center, or crochet a smaller inner-ear panel and sew it on.
D) Bunny Feet (Make 2)
Small oval feet at the bottom front for extra cuteness.
Rnd 1: MR, 6 sc ,(6)
Rnd 2: (sc, inc) x3 (9)
Rnd 3: sc around (9)
Fasten off leaving a sewing tail.
Flatten slightly when sewing so they look like little paws.
7) Assembly Instructions
- Attach the hea,d:
- Position the head on the front top edge of the basket (not centered on top—slightly forward gives the “holder” look).
- Sew securely around the bottom of the head to the basket rim.
- Sew the ears:
- Place ears on the top of the head, slightly angled outward.
- Sew the base of each ear firmly (sew through multiple stitches so they don’t wobble).
- Attach feet:
- Sew two feet to the lower front of the basket base.
- Place them evenly so the bunny looks balanced standing upright.
- Secure the egg holder opening (optional):
- If the opening feels loose, add one round of sl st around the rim, or weave yarn through rim stitches and gently tighten like a drawstring (don’t pull too tight—egg should still slide in).
- Final check:
- Insert egg, adjust ears/feet placement if needed, and weave in all ends neatly.
8) Customization Ideas
- Pastel Easter colors: lavender, baby blue, mint, blush, butter yellow.
- Add bows: tiny crocheted bow or ribbon at the ear base (skip ribbons for babies).
- Different yarn textures: velvet yarn for extra plush bunnies; cotton for crisp baskets.
- Personalized faces: sleepy eyes, lashes, rosy cheeks, or a tiny tooth.
- Egg variety: make different sizes to fit plastic eggs, mini eggs, or chocolate surprise eggs.
9) Crochet Tips for Beginners
- Keep stitches even: maintain consistent tension and count stitches each round.
- Use a tight hook/yarn combo: tighter fabric helps the basket hold its shape and prevents gaps.
- Shape as you go: keep checking fit with a real egg while crocheting the basket sides.
- Neat sewing: pin pieces first, then sew using small, even stitches.
- Invisible decreases: make the basket and head look smoother, especially with light yarn colors.
10) Conclusion
These crochet Easter bunny egg holders are a quick, cheerful project that instantly adds handmade charm to your spring décor. Make a set in green, cream, and pink (or your favorite pastels), fill them with eggs or treats, and you’ll have the cutest Easter table accents and gift basket additions. Give it a try and make a whole bunny family!