Crochet Spooky Ghost Amigurumi With Devil Halloween Doll
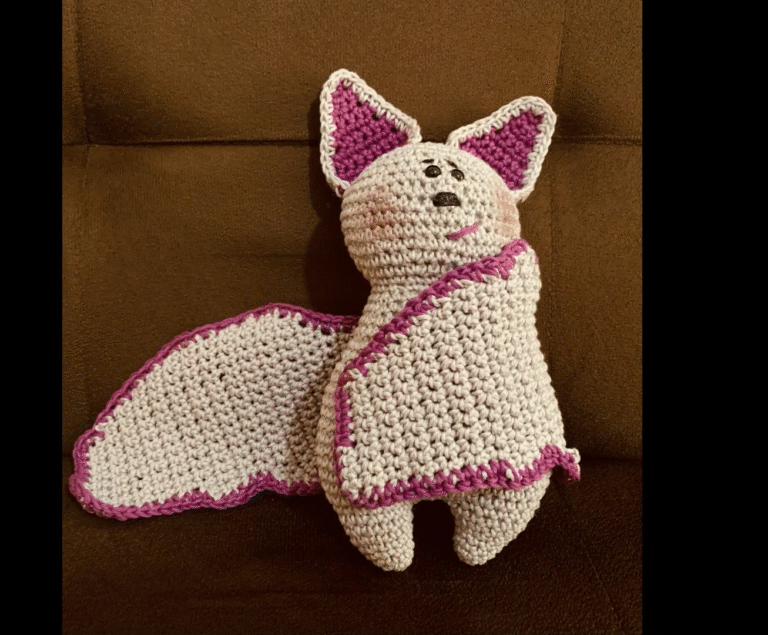
Make a Crochet Spooky Ghost Devil Halloween Doll amigurumi featuring a rounded ghost body with a flared base, small arms, two horns, a pointed tail, and simple embroidered facial details. The following instructions list materials, abbreviations, stitch counts, and assembly steps to complete the doll.
Create a Crochet Spooky Ghost Devil Halloween Doll Amigurumi with a smoothly shaped body, delicate frills, tiny hands, neat horns, and finished facial details, plus an optional hanging loop for display. This amigurumi crochet pattern uses clear rounds (R1–R18), careful stuffing, and clean sewing for eyes, fangs, and mouth, ideal for confident results.

Style it as Halloween home décor on a shelf, a door, or a tree ornament, or as a custom gift for collectors. Popular crochet keywords fit naturally here alongside high-value terms such as handmade home decor, personalized gifts, and custom wedding favors.
Crochet Spooky Ghost Devil Halloween Doll Amigurumi
A spooky-cute character can be the fastest way to make a handmade Halloween feel extra special. This Crochet Spooky Ghost Devil Halloween Doll Amigurumi blends two fun vibes at once: a soft little ghost shape and tiny devil details like horns and a pointed tail. Best of all, the build stays beginner-friendly because the body is mostly simple rounds, and the “spooky” look comes from small add-ons rather than complicated shaping. First, the plush body is crocheted, then the arms, horns, and tail are created, and finally, the face is placed for the perfect mischievous expression.
List of Materials
- Yarn (type + weight)
- Main color (ghost base): DK / Light Worsted (#3) acrylic or cotton blend — 45–60 g
- Accent color (devil details): DK / Light Worsted (#3) — 10–15 g
- Optional: small amount of black or dark yarn/thread for mouth and brows — 1–2 g
- Hook size
- 2.75 mm or 3.0 mm crochet hook (choose the size that creates tight stitches with the yarn)
- Notions
- Safety eyes: 8 mm (or 6 mm for a smaller face)
- Stuffing: polyester fiberfill — about 20–30 g
- Stitch marker: 1 locking marker (or a scrap of yarn)
- Tapestry needle: blunt tip for sewing
- Scissors
- Accessories (optional)
- Keychain ring: 25–30 mm split ring
- Small ribbon: 20–25 cm (to hang like an ornament)
- Tiny bell or charm: 1 piece (optional, for extra Halloween sparkle)
Skill Level
Easy / Beginner-friendly.
Single crochet, increases, decreases, and simple sewing are the main skills. Additionally, the project stays approachable because each extra piece is small and repeats quickly.
Making Time (Overview)
Total time is approximately 2.5–4 hours, depending on speed and comfort level.
- Body: 70–100 minutes
- Arms (make 2): 20–30 minutes
- Horns (make 2): 20–30 minutes
- Tail: 15–25 minutes
- Face + assembly: 35–55 minutes
- Optional accessories: 10–15 minutes
Step-by-Step Instructions
Before starting, keep these quick notes nearby:
- Work in continuous rounds (no joining) unless stated.
- Use a stitch marker to mark the first stitch of each round.
- For a neat look, keep stitches tight so stuffing does not show.
- Standard amigurumi abbreviations are used:
MR (magic ring), sc (single crochet), inc (increase), dec (decrease), sl st (slip stitch), ch (chain)
Body (3 Clear Steps) — Making Time: 70–100 minutes
1) Start the rounded head and upper body
- First, make a magic ring (MR) with 6 sc.
- Next, increase around until a smooth dome forms (typical pattern: add 6 stitches per round).
- Meanwhile, keep counting stitches every round, because even one missed increase can tilt the head.
Beginner tip: If the magic ring feels tricky, start with ch 2 and place 6 sc in the second chain. Then continue as normal.
2) Build the main body and shape the “ghost drape.”
- After the head is wide enough, crochet several even rounds to create height.
- Then, continue into the body by keeping the same stitch count for a few rounds.
- Later, create a gentle flare near the bottom by spacing increases around the final third of the body.
Beginner tip: A ghost looks best with a soft flare. Therefore, keepthe increases subtle rather than dramatic.
3) Close the base with a wavy hem (simple option)
- First, crochet one round that slightly increases to widen the hem.
- Next, add a decorative edge: (sc, hdc, dc, hdc, sc) repeated around makes a soft wave.
- Finally, fasten off, leaving a yarn tail for minor shaping or joining.
Stuffing note: Start stuffing once the body is halfway done. Then add a little more right before closing the top area (if opening remains) so the shape stays rounded but not stiff.
Additional Parts (Ears / Tail / Arms / Face) — With Making Time
This character focuses on horns and tail instead of ears, so the “devil” look stays clear. First, the arms are made, then the horns, and then the tail.
Arms (make 2) — Making Time: 20–30 minutes
- Create the hand
- First, makean MR with 6 sc.
- Next, crochet 1 round even (6 sc).
- Then, lightly stuff only the hand area, because flat arms sit better against the body.
- Form the arm tube
- Now, crochet several rounds even to create a short tube.
- Meanwhile, keep the arm slim by avoiding increases.
- After that, pinch the opening flat and sc across to close (or sew shut).
Beginner tip: Flat-closed arms look cleaner and sew on more easily. As a result, the doll keeps a tidy silhouette.
Horns (make 2) — Making Time: 20–30 minutes
- Start small and taper
- First, makean MR with 4 sc.
- Next, crochet 1–2 rounds even.
- Then, increase slightly (for example, add 1–2 increases spaced out) to create a gentle cone.
- Finish and leave a sewing tail
- Later, stop when the horn looks proportionate to the head.
- Finally, fasten off with a long tail for sewing.
Beginner tip: Stuffing horns is optional. However, a tiny pinch of stuffing can help them stand up if the yarn is soft.
Tail — Making Time: 15–25 minutes
- Create a thin tail cord
- First, ch 12–18 (shorter for a chubby doll, longer for a dangling look).
- Next, starting in the second chain, sc in each chain to form a sturdy cord.
- Meanwhile, keep tension even so the tail does not twist too much.
- Add a pointed tip
- Then, at the end, crochet a small triangle-like tip:
- sc, hdc, dc in the last chain (or last stitch)
- After that, rotate and stitch back down one side if extra thickness is wanted.
- Finally, fasten off, leaving a tail for sewing.
Beginner tip: If the tail curls, block it gently with a little steam from a distance, or simply embrace the curl for a playful “swish.”
Face (features) — Making Time: 10–20 minutes
The expression makes the character. Therefore, keep it simple and centered.
- Safety eyes
- First, place safety eyes between the upper head rounds, roughly 6–8 stitches apart.
- Next, step back and check symmetry before locking the backs.
- Then, secure them firmly.
- Mouth + small fangs (optional but cute)
- After the eyes are set, embroider a curved smile with black yarn or embroidery thread.
- Then, add two tiny white stitches beneath the smile for “fangs,” or make one fang for a cheeky look.
- Finally, add small blush dots with pink yarn if desired.
Beginner tip: Use straight pins to “audition” face placement first. Consequently, the final expression feels intentional rather than accidental.
Accessories / Details (if applicable) — Making Time: 10–15 minutes
Optional hanging loop or keychain
- First, decide whether this doll will be a shelf plush or a bag charm.
- Next, for an ornament loop, attach yarn at the top of the head and ch 20–25, then sl st back to form a loop.
- Alternatively, for a keychain, sew a small folded ribbon to the top and attach a 25–30 mm split ring.
Beginner tip: If the doll hangs, reinforce the loop with two passes of yarn. As a result, it holds up better over time.
Face & Assembly — Simple Explanations + Beginner Tips (Making Time: 35–55 minutes)
Assembly goes smoothly when each piece is pinned first. So, use pins or stitch markers to “park” pieces before sewing.
- Attach the horns
- First, pin the horns on the top of the head, spacing them evenly.
- Next, sew around the base of each horn using small whip stitches.
- Finally, weave in ends inside the head.
Placement tip: Horns look best slightly forward rather than directly on the crown. Therefore, aim for a gentle “devil” angle.
- Sew on the arms
- Next, pin arms to the sides of the body, about one-third down from the top.
- Then sew them on with neat stitches through both layers.
- Meanwhile, keep the arms slightly forward for a “huggy” pose.
- Attach the tail
- After that, position the tail on the lower back.
- Then sew the top of the tail securely with several passes.
- Finally, hide the yarn end inside the body.
- Final face check
- Now confirm eye direction, mouth curve, and fang placement.
- Then adjust with a few stitches if needed.
- Lastly, weave in every end and trim carefully.
Special Features
- Charming contrast: The ghost body stays soft and simple, while the horns and tail add personality without complicated shaping.
- Clean amigurumi texture: Tight single crochet creates a smooth surface, which helps the face details look crisp.
- Expression control: Small changes like eyebrow angle or mouth curve instantly shift the vibe from sweet to mischievous.
- Display-friendly shape: The flared hem helps the doll sit nicely on a shelf or tray, making it perfect for seasonal décor.
Sizing Tips
Yarn and hook choices change the finished size quickly. Therefore, pick the combo that matches the intended use.
- Using DK yarn + 2.75–3.0 mm hook:
- Finished height: approximately 10–14 cm (4–5.5 in), depending on hem and horn size.
- Using worsted (#4) + 3.5–4.0 mm hook:
- Finished height: approximately 14–18 cm (5.5–7 in).
- Additionally, stitches may loosen, so stuffing could show if tension is relaxed.
- Using plush/chenille yarn:
- The doll becomes larger and extremely soft.
- However, stitches can be harder to count, so a stitch marker becomes essential.
Proportion tip: If the body becomes larger, scale up horns and tail slightly. Otherwise, the devil details may look too tiny.
Finishing Tips
- Invisible decreases for smoother curves
First, use an invisible decrease (front loops only) instead of a standard dec. As a result, the head and body look less bumpy. - Stuff gradually, not all at once
Next, add stuffing in small amounts and press it into shape. Meanwhile, keep the surface firm but not stretched. - Weave ends like a secret.
Later, run yarn tails through several stitches inside the body, then trim. Consequently, ends will not pop out during handling. - Shape the face gently.y
Finally, if the eyes sit too flat, a small “eye indent” can be made by stitching from the back of the head to the eye area and tightening slightly. Then tie off securely inside.
Common Mistakes to Avoid
- Forgetting to mark the first stitch
Without a marker, rounds drift. Therefore, always move the marker at the start of each round. - Loose tension causing stuffing to show
If gaps appear, switch to a smaller hook ortighten then tension. Additionally, avoid overstuffing, because that forces fibers outward. - Uneven increases make a lumpy head
Missed increases create flat spots. So, count stitches every round, especially in the early head rounds. - Crooked face placement
Eyes set too high or too far apart change the personality. Consequently, pin placement first, then commit to the safety eye backs. - Weak sewing on the horns or tail
Small parts get tugged during play. Therefore, sew with multiple passes and snug stitches, then weave ends deeply.
Variations & Customization Ideas
- Color changes
- Classic: white body + red horns/tail
- Soft gothic: pale gray body + burgundy accents
- Cute pastel: cream body + dusty pink horns/tail (sweet-spooky)
- Night mode: black body + neon green face embroidery (bold décor)
- Size options
- Mini keychain: use fingering yarn + 2.0–2.25 mm hook
- Desk buddy: use worsted yarn + 3.5 mm hook
- Plush décor: use chunky yarn + matching hook (tight tension still matters)
- Expression and theme ideas
- Add tiny embroidered eyebrows for extra attitude
- Swap fangs for a small “o” mouth for a surprised ghost
- Add a mini bow tie, tiny cape, or a stitched-on pumpkin patch
- Make it a “holiday crossover” by using a winter scarf in black and red
Tutor Suggestions
- First, practice tight single crochet on a small swatch; then start the body once the stitches feel consistent.
- Next, focus on a clean shape rather than speed, because neat tension makes every later step easier.
- Meanwhile, treat assembly as the fun part: pin everything, step back, and adjust until the character feels balanced.
- Later, take a quick photo before sewing; oddly enough, photos reveal crooked placement faster than the eyes in the moment.
- Finally, celebrate the small wins, clean decreases, even rounds, and a centered face because those are the skills that level up all future amigurumi projects.
This Crochet Spooky Ghost Devil Halloween Doll Amigurumi is simple enough for beginners, yet detailed enough to look polished on a mantel, tucked into a Halloween gift basket, or clipped onto a bag as a seasonal charm. First, the body sets the cute ghost base, next the horns and tail bring the devilish twist, and finally the face turns it into a character that feels truly handmade.