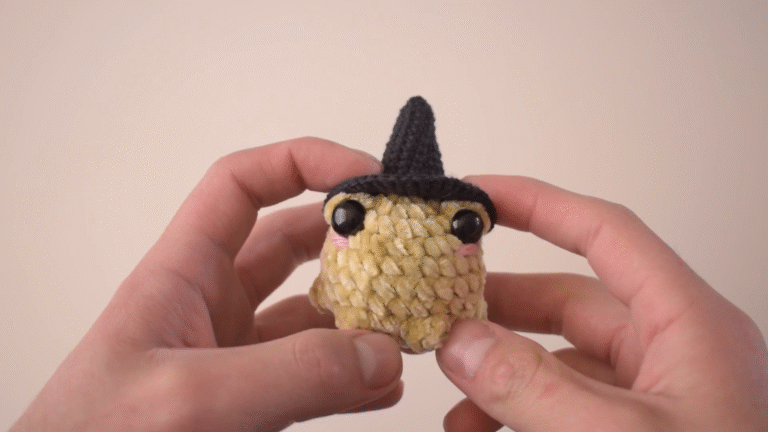
Graceful Crochet Deepsea Fish Amigurumi Pattern Ocean Toy
Stitch the Graceful Crochet Deepsea Fish Amigurumi, a charming ocean toy for beginners, quick, relaxing, and customizable, making an adorable handmade keepsake and thoughtful, sea-loving gift.
Bring gentle sea magic to your hook with the Graceful Crochet Deep-Sea Fish Amigurumi Pattern, a beginner-friendly toy that works up quickly and looks irresistibly cute. Rounded shaping, soft stuffing, and fluttery fins create a huggable fish with lifelike movement, while simple stitches keep the process relaxing and fun.

Customize stripes, gradients, or solid hues from stash yarn to match any theme. Practical as nursery decor, sensory-friendly play, and a thoughtful handmade gift, this portable project also shines at craft fairs and in marine-themed classrooms.
Graceful Crochet Deep-Sea Fish Amigurumi Pattern
Welcome a wave of calm creativity with the Graceful Crochet Deep-Sea Fish Amigurumi Pattern. To begin, this beginner-friendly ocean friend features soft curves, fluttery fins, and a soothing, rounded body built with simple stitches. First, the body forms in gentle, rhythmic rounds. Next, the fins add flow and subtle movement. Then, expressive details bring the fish to life. Ultimately, the result is a charming amigurumi that suits gift boxes, nursery shelves, and desk corners alike. Moreover, the pattern adapts easily to different yarn weights, color stories, and accessories, so every fish feels delightfully personal.
Required Materials
Before starting, gather everything in one spot. That way, each step moves smoothly without interruptions.
Yarn:
- Main Color (MC): 50 g (1.75 oz) DK/light-worsted (Size 3) cotton or cotton blend
- Contrast Color (CC) for fins/accents: 15–20 g (0.5–0.7 oz) DK (Size 3)
- Optional stripe/accent scraps: a few grams in coordinating shades
Crochet Hook:
- 2.75 mm (C-2) for DK yarn, or adjust to achieve a firm fabric with no gaps
Safety Eyes:
- 8 mm round safety eyes (or embroider eyes for baby-safe use)
Stuffing:
- 20–30 g (0.7–1 oz) polyester fiberfill
Notions:
- 1 locking stitch marker
- Tapestry needle (blunt tip), size 16–18
- Scissors
- Straight pins or clips for positioning fins
Optional Accessories:
- 25 mm (1 in) keychain ring and small swivel clasp
- Small squeaker or rattle insert (approx. 22–28 mm)
- A handful of weighted poly pellets secured inside a small mesh pouch for a desk buddy
Stitches & Notes
For clarity, the pattern uses the following stitches: MR (magic ring), sc (single crochet), inc (increase: 2 sc in 1 st), dec (invisible decrease), sl st (slip stitch), ch (chain), picot (ch 3, sl st to first ch). Additionally, work in continuous rounds unless noted; therefore, place a stitch marker in the first stitch of each round and move it up as you go.
Skill Level
Beginner/Easy. Because the pattern uses basic stitches and gentle shaping, it suits first-time amigurumi makers while staying relaxing for experienced crocheters.
Making Time (Overview)
Plan approximately 3–4 hours for beginners or 2–3 hours for experienced crocheters.
- Body: 60–90 minutes
- Tail and side fins: 60–75 minutes
- Back flower fin and small details: 20–30 minutes
- Assembly and face: 20–30 minutes
Step-by-Step Instructions
Before you begin, read through all steps once; as a result, each section will feel familiar and organized. Next, make a quick swatch to confirm a firm fabric. Then, place a stitch marker and start the body.
Body (about 60–90 minutes)
Shape the head and upper body:
- Round 1: MR, 6 sc (6)
- Round 2: inc around (12)
- Round 3: (sc, inc) x 6 (18)
- Round 4: (2 sc, inc) x 6 (24)
- Round 5: (3 sc, inc) x 6 (30)
- Rounds 6–9: sc around (30)
- Round 10: (3 sc, dec) x 6 (24)
- Round 11: (2 sc, dec) x 6 (18)
At this point, the head begins to round out, which makes eye placement easier. Accordingly, insert 8 mm safety eyes between Rounds 7 and 8, spaced 7–8 stitches apart, and secure the washers firmly. Alternatively, for a baby-safe version, embroider eyes during assembly.
Fill out the belly and midsection:
- Round 12: (sc, inc) x 9 (27)
- Round 13: (2 sc, inc) x 9 (36)
- Rounds 14–18: sc around (36)
From Round 14 onward, begin stuffing lightly. Meanwhile, add small tufts evenly to maintain a smooth head and a softly rounded belly. Keep the fabric firm without overstretching. Optionally, for a gentle gradient, switch to CC for the lower half of each round in Rounds 15–18. To keep the inside tidy, carry the unused yarn with relaxed tension.
Taper to the tail base:
- Round 19: (4 sc, dec) x 6 (30)
- Round 20: (3 sc, dec) x 6 (24)
- Round 21: (2 sc, dec) x 6 (18)
- Round 22: (sc, dec) x 6 (12)
- Round 23: dec around (6), sl st to next st, fasten off
Before closing, finish stuffing to the desired firmness. Thus, the body ends in a rounded point that supports the tail fin securely.
Additional Parts
For graceful movement, make the tail first. After that, crochet the side fins, followed by the belly fin. Meanwhile, work the decorative back flower fin to add a whimsical, deep-sea touch.
Tail Fin (worked flat) — 20–30 minutes
- With CC, ch 14.
- Row 1: Beginning in second ch from hook, 13 sc, ch 1, turn.
- Row 2: sc across, ch 1, turn (13)
- Row 3: inc, 11 sc, inc (15), ch 1, turn.
- Row 4: sc across (15), ch 1, turn.
- Row 5: inc, 13 sc, inc (17), ch 1, turn.
- Row 6: sc across (17), ch 1, turn.
- Row 7: inc, 15 sc, inc (19), ch 1, turn.
- Row 8: sc across (19), ch 1, turn.
- Row 9: dec, 15 sc, dec (17), ch 1, turn.
- Row 10: sc across (17). Fasten off, leaving a long tail for sewing.
Because the fan shape is lightly flared, the tail looks soft and flowing. For extra ripple, block the tail gently after attaching.
Pectoral Fins (make 2) — 10–12 minutes each
- With CC, MR, work: (sc, hdc, dc, dc, hdc, sc) into ring. Pull tight. Sl st to first st to close. Fasten off with a long tail for sewing.
Place these teardrop fins slightly behind the eyes for a natural swimming pose. As a result, the silhouette appears balanced from both sides.
Belly Fin (anal fin) — 6–8 minutes
- With CC, ch 5.
- Row 1: Starting in the second ch, 4 sc, ch 1, turn.
- Row 2: sc across (4), ch 1, turn.
- Row 3: dec, dec (2), ch 1, turn.
- Row 4: sc2tog (1). Fasten off with a long tail.
This neat triangle anchors the lower profile; therefore, it subtly improves stability when the fish sits on a flat surface.
Back Flower Fin (decorative dorsal bloom) — 15–20 minutes
- With CC or a contrasting accent yarn, MR.
- Round 1: 6 sc into ring (6), do not join.
- Round 2: In each stitch, work a petal as follows: (sl st, ch 2, 3 dc, ch 2, sl st) into the same stitch; repeat around to create 6 petals. Sl st to first sl st to finish the round.
- Optional Round 3 (picot edge): For extra delicacy, work (sl st into top of petal, picot, sl st) across each petal. Fasten off with a long tail.
When attached slightly behind center, this bloom suggests a gentle dorsal fin with a floral twist. Additionally, it pairs beautifully with gradient color stories.
Optional Accent Stripes (surface slip stitch) — 5–10 minutes
Using a contrasting yarn, surface slip stitch smooth lines along the sides to mimic natural striping. Keep tension relaxed to prevent puckering; in turn, the body maintains a sleek profile.
Accessories and Details (if applicable)
For versatility, consider these simple add-ons. Consequently, the fish easily becomes a keychain, rattle, or desk fidget.
- Keychain Finish: Attach a 25 mm ring to a short crocheted loop at the top back. Ch 6, sl st to form a loop, sew securely, and clip on the ring.
- Rattle or Squeaker: Place the insert in the center of the stuffing. Then, surround it with fiberfill to prevent shifting.
- “Glow” Spots: Embroider tiny French knots or satin stitch dots using pale or neon yarn to suggest deep-sea bioluminescence. As a result, the fish looks lively even under gentle room light.
Face & Assembly
First, pin all parts to preview the balance. Next, sew pieces from smallest to largest so handling remains easy. Afterward, weave in ends carefully for a tidy finish.
- Eyes: If not already placed, embroider eyes with black yarn using satin stitch. Otherwise, secure safety eyes between Rounds 7 and 8, spaced 7–8 stitches apart.
- Mouth: With a short length of contrasting yarn, embroider a tiny smile or neutral line slightly below the eyes using backstitch. For extra sweetness, tilt the ends upward just a touch.
- Tail: Center the flat edge of the tail at the body’s tapered end. Then, whipstitch through both layers using the long tail. Add a few extra corner stitches for strength.
- Pectoral Fins: Sew one fin on each side, 1–2 rounds behind the eyes, angled slightly back to imply motion.
- Belly Fin: Attach centrally along the lower body at the midsection to complete the silhouette.
- Back Flower Fin: Place on top, slightly behind center, and stitch around the base securely so the petals remain airy.
Beginner-friendly tips:
- Pin parts symmetrically; then, step back to check alignment from several angles.
- Use a ladder stitch for nearly invisible joins; consequently, seams blend neatly into the fabric.
- Maintain gentle, even tension while sewing to avoid puckers and gaps.
Special Features for (Crochet Deepsea Fish Amigurumi)
Notably, this design emphasizes calm shaping and elegant flow while staying approachable.
- Graceful shaping: A rounded head blends into a soft belly, then tapers smoothly to the tail base for balanced proportions.
- Flowing finwork: A gentle fan tail and teardrop side fins suggest lifelike movement, while the decorative back flower adds a unique silhouette.
- Expressive face: Minimal features, placed thoughtfully, create a peaceful expression suited to gifts and décor.
- Stash-friendly yardage: Small amounts of yarn make this project efficient and color-play friendly.
Sizing Tips
With DK (Size 3) yarn and a 2.75 mm hook, the fish measures about 13–15 cm (5–6 in) long, not including tail flare. With worsted (Size 4) yarn and a 3.5 mm hook, expect approximately 16–18 cm (6.25–7 in). Meanwhile, chenille/super bulky with a 6 mm hook produces a 25–28 cm (10–11 in) huggable plush.
- If stuffing shows, size down the hook until the fabric feels firm.
- Conversely, if the fabric feels stiff, size up by 0.25–0.5 mm to protect hands while preserving density.
- For keychain minis, choose sport-weight (Size 2) yarn with a 2.25 mm hook to reduce bulk while keeping details crisp.
Finishing Tips for (Crochet Deepsea Fish Amigurumi)
For a polished look, small habits create big results. Therefore, consider the following:
- Neat edges: Use invisible decreases to maintain smooth shaping.
- Even stuffing: Add small tufts and smooth the surface consistently; as a result, the face rests naturally, and the belly remains rounded.
- Invisible joins: When changing colors or finishing round pieces, use a needle join to avoid visible steps.
- Shaping finesse: After sewing fins, pinch lightly at the base while the yarn is still attached; then, add one or two extra stitches to lock in a gentle curve.
- Blocking touch: Pin fins flat on a towel and steam lightly from above (avoid touching acrylic with the iron). Finally, allow to cool completely before unpinning.
Common Mistakes to Avoid for (Crochet Deepsea Fish Amigurumi)
Because small toys magnify tiny issues, careful attention helps. Accordingly, watch for the following:
- Skipping the stitch marker: Rounds may drift,t and counts become inconsistent. Always move the marker up each round.
- Loose stitches: If stuffing peeks through, switch to a smaller hook; thus, the fabric stays firm and durable.
- Overstuffing the head: Excess stuffing distorts the face and widens eye placement. Instead, add gradually and check after each tuft.
- Uneven sewing tension: Pulling too tight causes wrinkles, while loose joins leave gaps. Therefore, aim for steady, moderate tension.
- Misplaced fins: Fins set too far forward or back upset balance. Consequently, pin first, compare both sides, and only then sew.
- Unsafe details for infants: Replace safety eyes with embroidered eyes and secure all knots thoroughly.
Variations & Customization Ideas for (Crochet Deepsea Fish Amigurumi)
To personalize the fish, explore color, texture, and size. Consequently, each version feels unique.
Color stories:
- Coral Reef Brights: Alternate stripes in pink, teal, and sunshine yellow for a playful, tropical mood.
- Deep-Sea Glow: Work the body in navy or charcoal; then, embroider pale blue or neon “glow” spots for a bioluminescent touch.
- Ombre Gradients: Hold two strands of fine yarn together and swap one strand every few rounds to create a soft fade.
Tail transformations:
- Betta-Style Ruffle: Add two extra increase rows and finish with a picot edging for dramatic flow.
- Koi-Inspired Markings: Use surface slip-stitch patches to create organic, painterly spots.
Size shifts:
- Pocket Pal: Choose sport-weight yarn with a 2.25 mm hook for a tiny charm or keychain.
- Huggable Plush: Use velvet/chenille yarn with a 5–6 mm hook for a large, squishy companion.
Texture play:
- Subtle Ridges: Work one or two body rounds in back loops only to suggest gentle segment lines.
- Sparkle Accents: Carry a strand of metallic thread in the tail for shimmering movement.
Themes:
- Classroom Ocean Set: Make several fish in different colors and string them into a cheerful garland.
- Nursery Mobile: Create four to six fish in soft pastels and suspend them from a mobile hoop with braided cords.
Tutor Suggestions for (Crochet Deepsea Fish Amigurumi)
For stress-free stitching, plan small checkpoints. Consequently, progress stays steady and enjoyable.
- Read first, stitch second: Skim the entire pattern; then, begin with confidence.
- Tension check: Start with a small sc circle. If it feels loose, size down the hook; if it feels rigid, size up slightly.
- Magic ring mastery: Pinch the first stitches, pull the tail gradually, and secure the ring tail with a knot after Round 2 to prevent loosening.
- Count kindly: After each increase or decrease round, count stitches before moving on. Moreover, place a removable marker every 6–9 stitches on longer rounds to track progress.
- Pin parts first: Symmetry matters; therefore, preview placement with pins and adjust before sewing.
- Manage ends: Hold tails with a small clip while working. Later, weave ends in a zigzag path to lock them invisibly.
- Gentle breaks: Rest hands briefly every few rounds; as a result, tension remains consistent and stitches look smooth.
- Confidence boost: If a round seems off, unravel a few stitches and continue. Ultimately, the fabric still appears neat after a small correction.
Closing for (Crochet Deepsea Fish Amigurumi)
With calm rounds, graceful shaping, and beginner-friendly details, this pattern turns into a relaxing, giftable make. First, the body builds quickly. Next, the fins add flow and personality. Then, expressive features complete the look. Finally, color choices and accessories transform one simple pattern into many unique ocean friends. Choose a palette that sparks joy, adjust the size to suit the recipient, and enjoy a smooth, step-by-step journey that finishes beautifully with crystal-clear transitions from start to finish.