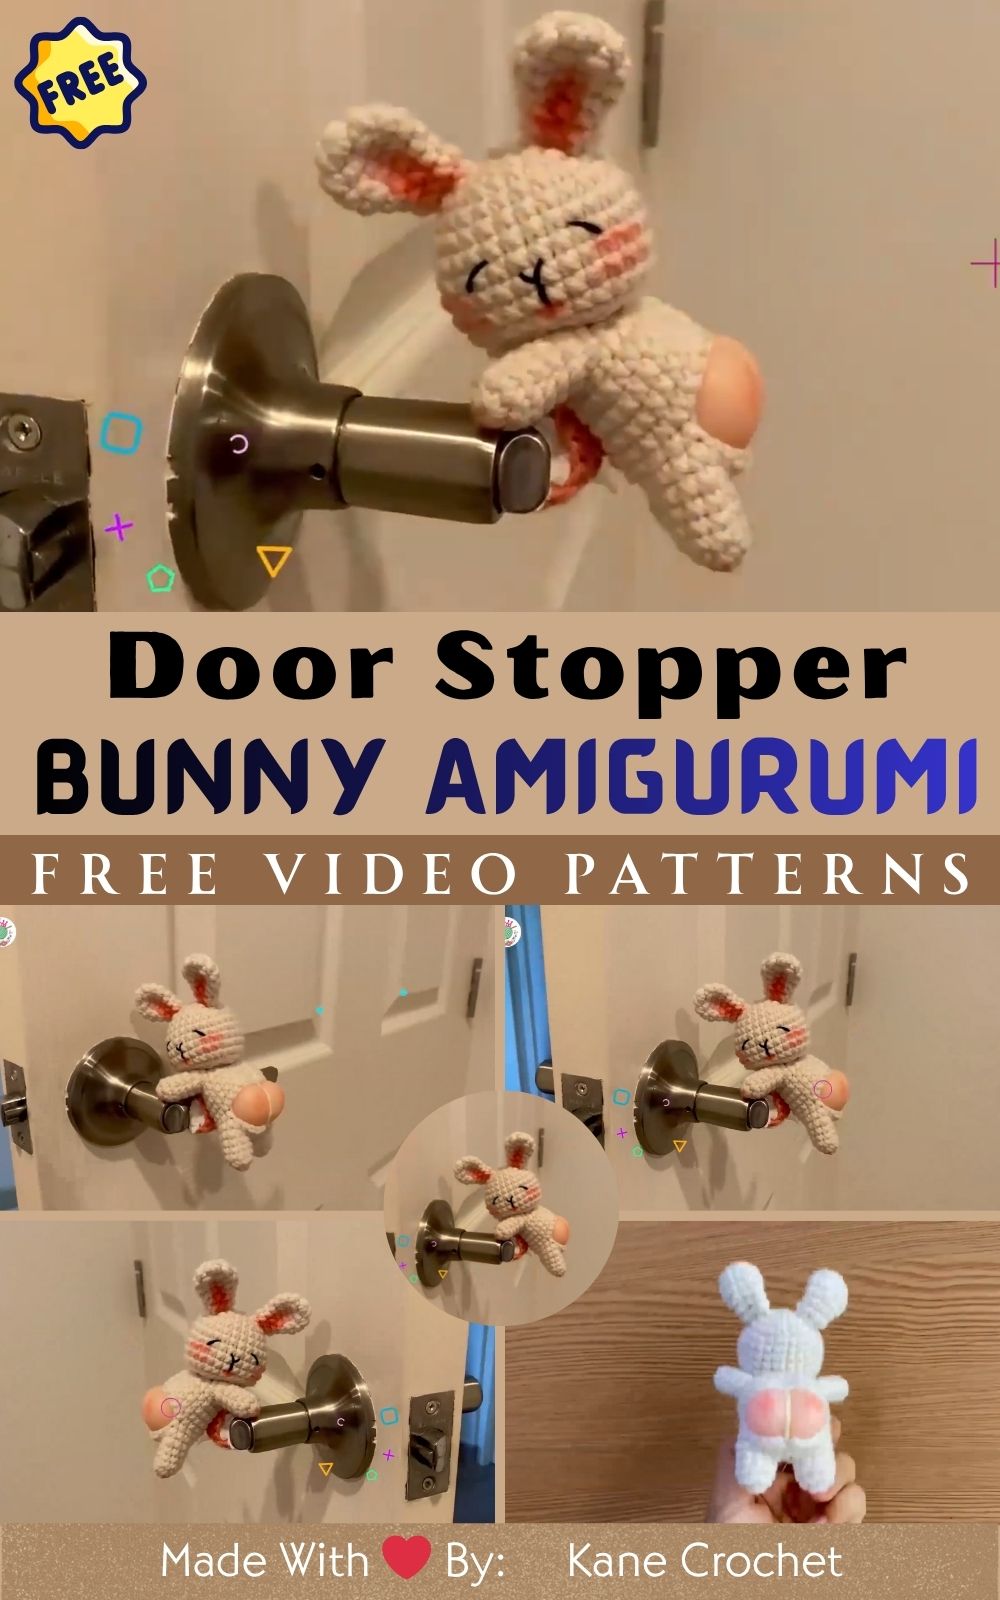
Crochet Door Stopper Bunny Amigurumi Pattern for Beginners
Crocheting is more than just a hobby; it’s a delightful journey from imagination to creation. The magic of crafting something beautiful from a simple skein of yarn brings a unique satisfaction that few other activities can match. There’s a profound joy in watching your creativity unfold into something tangible and heartwarming, as each stitch contributes to a masterpiece of your own making. With crochet, the possibilities are endless, and the results are as varied and unique as the creators themselves.
Among the myriad of projects that crochet enthusiasts can embark on, the Crochet Door Stopper Bunny Amigurumi stands out as a particularly charming and eye-catching endeavor. This adorable bunny serves not only as a functional door stopper but also as a whimsical decorative piece. Its unique design captures the hearts of both the maker and the beholder, making it an ideal project for those who appreciate the blend of creativity and practicality.
Whether you are a beginner or an advanced crocheter, this project offers a perfect blend of simplicity and challenge. It allows beginners to learn and practice essential techniques while offering seasoned crafters the freedom to add personal touches and explore new creative avenues. The bunny door stopper is a delightful project that promises satisfaction and fun for all skill levels.
Crocheting embodies a calming rhythm that soothes the mind and soul, providing a therapeutic escape from the hustle and bustle of daily life. The sense of accomplishment that comes from creating handmade art is unparalleled, and this bunny amigurumi project is a wonderful opportunity for slow crafting and gifting. It invites you to take a pause, enjoy the process, and create something that carries a piece of your heart in every stitch.
Materials & Tools
Before diving into the creation of your Crochet Door Stopper Bunny Amigurumi, it’s essential to gather all the necessary materials and tools. Here’s what you’ll need:
-
Yarn: Choose a medium-weight yarn, commonly labeled as worsted weight or category 4. Opt for soft acrylic or cotton for durability and ease of use. Consider selecting a main color for the body and complementary colors for accents like the ears, paws, and tail.
-
Hook Size: A 3.5mm (E) crochet hook is typically suitable for this project, ensuring tight stitches that hold the stuffing securely.
-
Stuffing: Polyester fiberfill is ideal for giving your bunny a plush, cuddly appearance. Be sure to fill it evenly to maintain shape and stability.
-
Safety Eyes: These add personality to your bunny. Choose a size that fits proportionally to your amigurumi’s head.
-
Scissors: A sharp pair will help you cut yarn cleanly.
-
Tapestry Needle: This tool is indispensable for sewing parts together and weaving in ends.
-
Stitch Markers: These will help you keep track of rounds, especially useful for those just starting with amigurumi projects.
Advice on Yarn Selection: When choosing yarn, consider the texture and color combinations. Soft, pastel colors create a cute and calming look, while vibrant hues can make your bunny more vivid and playful. Ensure the yarn is easy to work with, especially if you’re a beginner. A smooth texture will help you see stitches clearly and avoid unnecessary frustration.
Step-by-Step Crochet Instructions
Creating a Crochet Door Stopper Bunny Amigurumi involves several steps, each contributing to the character and charm of your final piece. Follow these detailed instructions to bring your bunny to life:
1. Making the Head
Begin with a magic ring and work in continuous rounds. Increase stitches evenly to form a rounded shape. As you progress, incorporate safety eyes at the appropriate round, ensuring they are securely fastened. Continue until the head reaches the desired size, then begin decreasing to close off the shape, leaving an opening for stuffing.
2. Forming the Neck and Upper Body
From the head, continue crocheting down to form the neck. The transition should be gradual, maintaining smooth curves. Once the neck is defined, increase stitches to widen into the upper body, ensuring the shape is proportional to the head.
3. Building the Main Body
Continue working in rounds, increasing and then maintaining the stitch count to form the main body. This section should be more substantial, providing the stability needed for the door stopper. Stuff as you go to ensure even distribution, focusing on a firm yet pliable texture.
4. Shaping or Attaching the Base
Depending on your design, either crochet a separate circular base and sew it to the body or continue working from the body to close seamlessly. Ensure this section is flat and sturdy, as it will bear the weight of the door.
5. Creating the Tail or Limbs
For a cute finishing touch, crochet a small ball for the tail, attaching it to the rear of the body. If adding limbs, create small cylindrical shapes, either crocheted continuously from the body or sewn separately. Position them naturally for a balanced appearance.
6. Assembly and Positioning
Carefully sew all parts together using a tapestry needle. Pay attention to symmetry and alignment, ensuring that limbs and ears are positioned evenly.
7. Adding Final Touches and Accessories
Enhance your bunny with accessories like bows or small scarves. Embellishments add personality and charm, making your creation uniquely yours.
Expert Tips: To achieve a polished look, keep stitches tight and even. Use a smaller hook if needed to ensure firmness. When stuffing, distribute evenly to avoid lumps, and consider adding a small weight at the base for stability as a door stopper.
Customization Ideas
Personalizing your Crochet Door Stopper Bunny Amigurumi is part of the fun. Here are some creative ideas:
-
Alternative Color Schemes: Try monochrome for a minimalist look or rainbow colors for a playful twist.
-
Different Yarn Types: Use fuzzy yarn for a fluffy appearance or metallic thread for a whimsical, shiny effect.
-
Themed Versions: Celebrate holidays with themed bunnies, such as pastel for Easter or red and green for Christmas.
-
Add-ons: Enhance your bunny with bows, tiny hats, or props like mini carrots or flowers.
Advanced Tips & Troubleshooting
Even with experience, challenges can arise. Here are expert tips to help you navigate common issues:
-
Invisible Decreases: Use the front loops only for a seamless decrease that blends into your fabric.
-
Even Stitch Tension: Practice consistency in your tension to avoid uneven shapes.
-
Preventing Twists in Rounds: Use stitch markers to track the beginning of each round and ensure your work remains flat and even.
-
Fixing Uneven Shapes or Loose Stitches: Rework sections with inconsistencies, and use a smaller hook if needed to tighten stitches.
-
Proper Stuffing Balance: Ensure stuffing is evenly distributed, focusing on key areas like the head and body for stability.
-
Seamless Part Joining: Use a whip stitch or invisible stitch for clean, professional seams.
-
Pattern Abbreviation Accuracy: Familiarize yourself with common abbreviations to read patterns fluently, reducing errors.
Care Instructions
To keep your bunny amigurumi looking its best, follow these care tips:
-
Gentle Hand Wash: Use lukewarm water and mild detergent to clean your bunny.
-
Air Dry Flat: Lay the bunny on a towel, reshaping as needed to maintain its form.
-
Avoid Direct Sunlight: Prolonged exposure can fade colors and weaken fibers.
-
Safe Storage Tips: Store in a cool, dry place, away from dust and moisture. Consider using a display case for protection.
Display & Gift Ideas
Your Crochet Door Stopper Bunny Amigurumi can serve various roles, from functional to decorative:
-
Home Décor Item: Place it in any room for a touch of whimsy and charm.
-
Kid’s Room Accessory: Add a playful element to children’s spaces with this adorable bunny.
-
Desk Companion: Brighten up your workspace with a cute, homemade friend.
-
Holiday Ornament: Incorporate into festive decorations for a unique twist.
-
Personalized Handmade Gift: Share the joy of your creation with loved ones, adding a personal note for a heartfelt touch.
Benefits Section
Creating a Crochet Door Stopper Bunny Amigurumi offers numerous benefits:
-
Relaxation and Mindfulness: The repetitive nature of crocheting promotes a meditative state, helping you unwind and focus.
-
Stress Relief Through Crafting: Engaging in creative tasks can alleviate stress and improve mental well-being.
-
Sense of Accomplishment and Joy: Completing a project brings a rewarding feeling of achievement and satisfaction.
-
Eco-Friendly, Sustainable Gifting: Handmade gifts are personal and environmentally conscious, reducing the need for mass-produced items.
-
Emotional Connection Through Handmade Art: Each piece carries the maker’s spirit, creating a bond between creator and recipient.
Photography & Social Media Tips
Showcase your finished bunny beautifully with these photography tips:
-
Use Natural Daylight: Capture clear, vibrant images by photographing in well-lit spaces.
-
Add Props: Enhance your photos with complementary items like baskets, flowers, or colored yarn.
-
Use Soft Backgrounds: Opt for neutral, uncluttered backgrounds to keep the focus on your amigurumi.
-
Try Close-Ups: Highlight intricate details and textures with close-up shots, showcasing the craftsmanship of your work.
Conclusion
Embarking on the crochet journey to create a Door Stopper Bunny Amigurumi is a fulfilling experience, offering a blend of creativity, relaxation, and joy. This project encourages you to transform simple yarn into something meaningful, cute, and full of personality. Whether you’re crafting for yourself or as a gift for someone special, this charming bunny is sure to bring smiles and warmth to any space. So gather your materials, let your imagination run wild, and enjoy the delightful process of bringing your handmade creation to life.