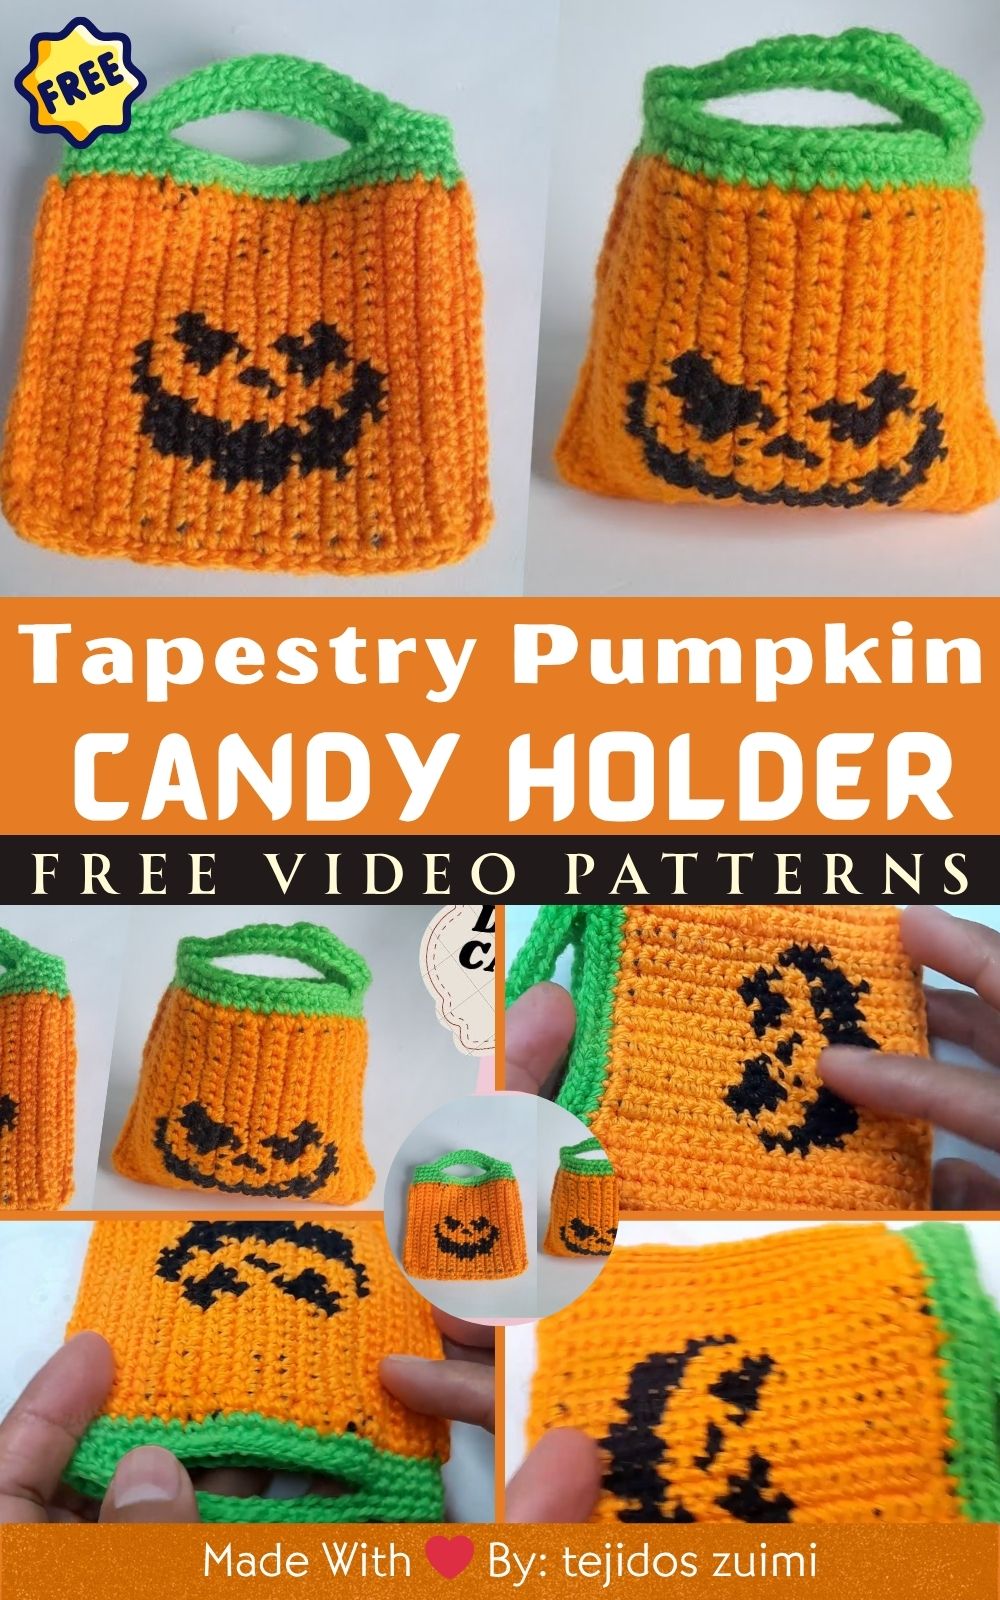
Crochet Tapestry Pumpkin Candy Holder for Spooky Halloween
There’s a special kind of joy that flows through your fingertips when you’re crafting something from yarn. The calming rhythm of each loop, the gentle pull of the hook, and the transformation of a simple strand into a three-dimensional creation… that’s the magic of crochet! It’s an artform that speaks to the heart. Whether you’re creating something for yourself or someone you love, the journey is as rewarding as the finished piece. And when your project blends creativity with function? That’s where crochet truly shines.
One project that beautifully marries creativity and purpose is the Crochet Tapestry Pumpkin Candy Holder. This adorable, Halloween-inspired container is more than just a seasonal craft. It’s both functional and festive, serving as a decorative bowl for treats and a fun tapestry-style amigurumi with a distinct pumpkin design. Its whimsical shape, vibrant colorwork, and candy-storing capability make it a standout piece in any spooky celebration. Whether perched on a desk, coffee table, or in little hands during trick-or-treat night — this pumpkin is sure to turn heads!
The best part? This project is flexible and accessible for both newbies and seasoned crocheters. You’ll explore the basics of tapestry crochet while also working in the round, shaping curves, and assembling parts. There’s room to play with colors, details, and accessories — making every pumpkin candy holder uniquely yours. Whether you’re a confident beginner eager to level up, or a crochet expert ready to embrace seasonal creativity, this is a joyful and rewarding project to try out.
3. Materials & Tools Section
Before you get started, make sure you have everything ready. Here’s what you’ll need to crochet your own tapestry pumpkin candy holder.
Yarn
-
Worsted Weight Yarn (Medium 4) or Sport/DK Weight Yarn
-
Main Color: Orange (pumpkin body)
-
Secondary Color: Green (stem and vine)
-
Detail Color: Black or brown (eyes and mouth)
-
Optional: White or cream (for added accents like sparkles or candy spots)
-
Yarn Tip: Go for a smooth-textured yarn (cotton or acrylic) that holds shape well — especially since this project doubles as a container. Cotton makes the structure sturdy; acrylic offers a soft, stretchy finish.
Crochet Hook
-
3.5 mm or 4.0 mm hook
-
Choose a size that matches your yarn weight and keeps the stitches tight.
-
Other Essentials
-
Fiberfill stuffing: Optional — if making a lid or decorative top.
-
Plastic canvas or cardboard: Optional — to reinforce the base.
-
Stitch markers: To mark your rounds.
-
Scissors: For trimming yarn ends.
-
Tapestry needle: For weaving in ends and sewing parts together.
-
Safety eyes or black yarn: To stitch or attach the face.
-
Buttons and ribbons: Optional embellishments.
Color Tip: Don’t be afraid to mix and match! Muted oranges give a vintage farmhouse feel, neon green adds a fun twist, or black with orange can create a gothic-style pumpkin.
4. Step-by-Step Crochet Instructions
Before You Begin
-
Always start projects like this in continuous rounds, using a stitch marker at your first stitch of each round.
-
Tapestry crochet means working with two or more colors in the same row, carrying yarn along as you switch. Make sure your non-working yarn stays inside your stitches to keep the inside neat.
1. Making the Pumpkin Head (Main Bowl)
-
Start with a magic ring and crochet 6 single crochets into the ring.
-
Round 2: Increase in each stitch (12)
-
Continue increasing evenly until the circle measures the width of the candy bowl base (usually 48–60 stitches).
-
Once the base is wide enough, crochet in even rounds (no increases) to build up the pumpkin body.
-
Begin the tapestry colorwork to create pumpkin ribbing or spooky jack-o’-lantern face motifs.
-
When desired height is reached (approx. 20–25 rounds total), finish with a round of slip stitches or decrease slightly inward for a tapered top.
Pro Tip: Carry the unused yarn loosely under your stitches to prevent puckering.
2. Forming the Stem and Lid
-
With green yarn, attach at the center top of the pumpkin.
-
Crochet in rounds:
-
Round 1: 6 SC
-
Round 2: 6 SC (no increases)
-
Round 3: Increase to 9 SC
-
Round 4–7: Work even
-
-
Leave a long tail for attaching and shaping.
-
Optionally, add a leaf or vine by chaining 15–20 and slip stitching back down.
3. Building the Main Body Depth
Once the sides are complete, decide if you want a lid or open basket-style candy holder.
-
For an open bowl: Work the top edge with slip stitches or a tighter finishing round.
-
For a lid: Make a flat circle to match the top opening diameter, then attach the stem in the center.
4. Shaping or Attaching Base
To ensure stability:
-
Insert a circle of plastic canvas or cardboard at the bottom.
-
Crochet a snug bottom circle and slip stitch it closed with the base inside.
5. Adding Limbs, Face, or Other Features (Optional)
To make your pumpkin more like a character:
-
Crochet small arms or feet using orange yarn, 6–8 rounds of SC.
-
Attach safety eyes, embroider eyebrows, and stitch a smile or frown.
Expert Tip: Use invisible decrease stitches for shaping tiny limbs without obvious lines.
6. Assembly and Positioning
-
Sew the stem securely onto the lid or top of the pumpkin.
-
Fold and pinch the edges to create pumpkin ridges using a long yarn strand and needle.
-
Position face parts evenly, and pin before sewing for perfect placement.
7. Final Touches
-
Add a bow tie, ribbon, top hat, or cat ears for a cute twist.
-
Insert candy — individually wrapped chocolates, peppermints, or Halloween goodies.
-
Place on a dish for final presentation.
5. Customization Ideas
Let your creativity run wild! Customize for theme, taste, or season:
-
Traditional Jack-o’-Lantern: Orange body, black facial features.
-
Kawaii Pumpkin: Pastel pink body with rosy cheeks and bow.
-
Gothic Pumpkin: Black and purple yarn with a stitched lace pattern.
-
Candy Corn Pumpkin: Striped pumpkin in yellow, orange, and white.
-
Ghostly Pumpkin: White yarn with spooky sparkles and felt eyes.
Add tiny crocheted bats, spiders, or candy canes to create a miniature scene.
6. Advanced Tips & Troubleshooting
Here are helpful pro pointers to ensure your spooky pumpkin turns out impeccably:
-
Invisible decreases: Insert hook through front loops only (FLO) of next two stitches — yarn over, pull through both, finish stitch.
-
Keeping even stitch tension: Check your hook size — tighten or loosen based on fabric stiffness.
-
Preventing twists in rounds: Always look at the right side of fabric and verify stitches are lined up.
-
Fixing uneven shapes: Lightly block or stuff more firmly in sagging areas.
-
Proper stuffing balance: Don’t overstuff or under-stuff — the piece should feel cushioned but moldable.
-
Seamless joins: Use mattress stitch or invisible join to merge parts smoothly.
-
Reading pattern abbreviations: SC = single crochet, INC = increase, DEC = decrease, SS = slip stitch…
-
Carrying yarn in tapestry: To avoid bulk, carry yarn behind work, not through entire piece.
7. Care Instructions
To keep your pumpkin candy holder looking brand new:
-
Hand wash gently in cold or lukewarm water using mild soap.
-
Squeeze lightly — do not wring.
-
Dry flat on clean towel away from heat or sunlight.
-
Store safely in a sealed clear bag or box during the off-season.
-
Avoid candy stains by lining the inside with fabric or felt.
8. Display & Gift Ideas
Your pumpkin isn’t just a crochet project — it’s a statement piece! Here’s how to show it off:
-
Fill it with treats as a Halloween centerpiece.
-
Use as festive decor on an autumn bookshelf.
-
Wrap as a gift for teachers, coworkers, or friends.
-
Pair with mini crochet ghosts or bats for themed display.
-
Place next to scary books for spooky aesthetic.
Perfect for kids’ rooms, party tables, reception desks, or Halloween clubs.
9. Benefits Section
Crocheting the Crochet Tapestry Pumpkin Candy Holder can bring you:
-
Relaxation and mindfulness through repetitive motion.
-
Calming creativity as you play with color and shape.
-
Sense of accomplishment after finishing a functional piece.
-
Sustainable crafting, replacing plastic décor with handmade.
-
Emotional connectivity in gifting something handmade and thoughtful.
10. Photography & Social Media Tips
Want your pumpkin to go viral or just look gorgeous online?
-
Use soft, natural daylight — mornings are best.
-
Add Halloween props — candy corn, leaves, stickers.
-
Try close-ups to show stitch detail and texture.
-
Use themed backdrops — burlap, black cloth, orange felt.
11. Conclusion
The Crochet Tapestry Pumpkin Candy Holder is more than just a seasonal craft — it’s a celebration of creativity, skill, and handmade joy. Whether you use it as a décor piece, a candy container, or a quirky gift, this little pumpkin is sure to warm hearts and spark smiles. Its playful design and practical charm make it the perfect fall project for crocheters of all levels.
Crocheting means slowing down, stitching one moment to the next. And at the end, you hold a piece that’s filled with meaning — laughter, texture, and love. So go ahead: pick the perfect yarn, make yourself a cup of cocoa, and stitch your way into spooky season with this delightful pumpkin masterpiece. You won’t regret it.